pixel
80% of Orgs That Paid Ransom Were Hit Again

80% of Orgs That Paid Ransom Were Hit Again

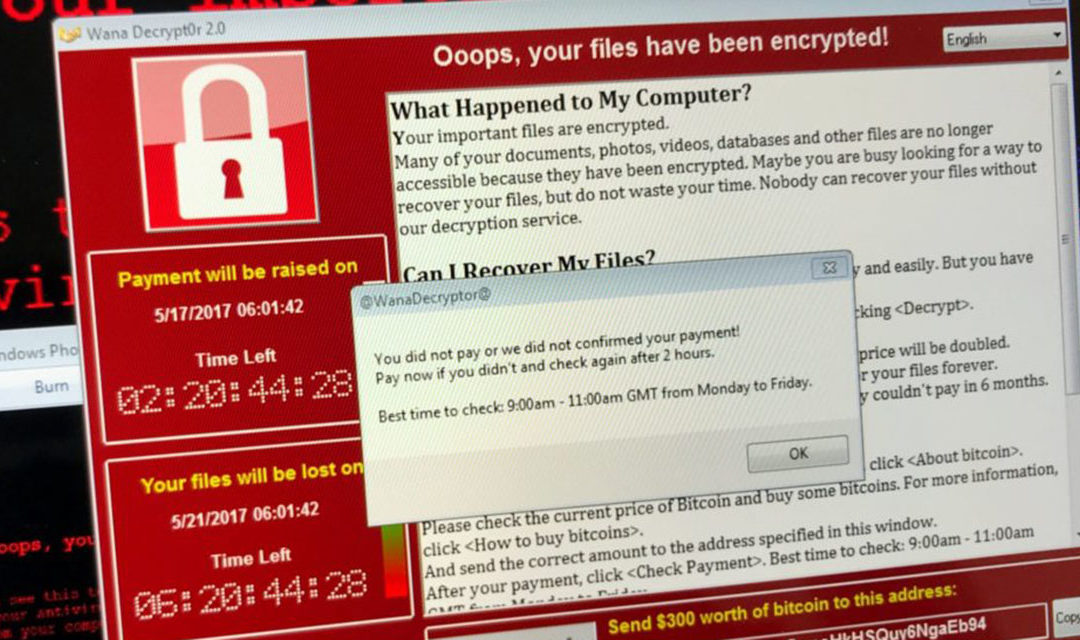
A new study by Cyberreason has found that 80% of organizations that were hit with ransomware and paid to get the decryption key, were then hit once again with another ransomware.

Approximately 50% of the new attacks were from the original criminals, and 50% were from new criminals.

The study also found that the top two solutions to help prevent a successful attack are security awareness training and security operations.

From my 30+ years of experience, those organizations and individuals that do not implement security awareness training and security operations do so primarily because they believe it is too difficult, time-consuming, or expensive to do so.

That may be true if you have to meet HIPAA, SEC, or Federal Contractor compliance. But the individual, household, and business can successfully implement ransomware, hacking, cybersecurity, and internet privacy defenses in just one day!

The Practical Paranoid Security Essentials DIY books have been walking users with no technical background through securing their computers, tablets, phones, networks, data, and privacy for over eight years. Easy enough for junior high students and my 86 years old aunt Rose, and comprehensive enough for IT professionals.

The easiest, most comprehensive work of its kind. We even guarantee your satisfaction!

Visit ThePracticalParanoid.com to get your copy of the best-selling cybersecurity guide available.

Secure ALL Your Internet of Things with VPN

Secure ALL Your Internet of Things with VPN

Secure ALL Your Internet of Things with VPN

Unless you have been living in an ice cave the past few years, you are sure to have heard the term “IoT” or “Internet of Things”. Given all the catastrophes each of us has had to deal with, you would be excused if you haven’t given this topic your attention. After all, we have been in survival mode.

Now that the election is over and you’ve gotten your shots, maybe you can take a few minutes to learn why IoT is vital to your cybersecurity and internet privacy.

What Is IoT?

The Internet of Things (IoT) is anything and everything that has an embedded sensor, software, or other technology for the purpose of connecting and exchanging data with other devices and systems over the internet.

Although you may not know it, you probably have a lot of IoT in your home and office. Items like:

  • Medical equipment (think heart monitors, CPAP machines, even the Help! I’ve fallen and can’t get up alerts.
  • Home automation, perhaps a water leak detector, smart thermostat, remote control lighting.
  • Smartwatch
  • iPhone or Android phone
  • Amazon Echo, Google Home, Apple HomePod, Samsung SmartThings Hub

… And Why Should I Care?

If you are like me, you may be just about cared-out by now. Between politics, climate collapse, pandemics, and discovering a few of my relatives are bat $#!* crazy, it’s getting more difficult by the day to care about new things.

But – you have to trust me on this – giving just a bit of thought to IoT is going to save you an armload of grief down the road.

Why?

Because even though you may do your best to secure your computers and mobile devices to help ensure your cybersecurity and internet privacy, few people give thought to securing their IoT. I mean, it’s only a doorbell (or thermostat, or voice-controlled TV, or, or, or…)

All these out-of-sight, out-of-mind devices are connected to your network. And if a criminal gains access to an IoT device, they gain access to your network, and may be able to view all of the data that travels through it – including usernames and passwords – and therefore have access to the keys to your kingdom.

Criminals are focusing attention on your IoT devices because they are often far easier to penetrate than servers, computers, and mobile devices. In fact, many of the older IoT devices (when it comes to technology, older may mean three years old) have no functional security at all!

Give Me an Example

How about:

  • A casino experienced a major data breach when criminals gained access to the network through a smart thermostat used in an aquarium.
  • A United Airlines flight was commandeered by a passenger who hacked the flight control system through the entertainment system.
  • Smart toasters were remotely hacked so they wouldn’t toast any bread the hacker considered unhealthy.
  • Freezers were remotely hacked to automatically shut down when ice cream was detected.
  • The Mirai malware takes over IoT devices such as cameras and monitors, turning the device into a bot.
  • A car was remotely hacked over the internet giving the hacker full access to the A/C, steering, and turning the engine off.
  • The FDA recalled almost 500,000 pacemakers over fears they could be remotely hacked.

As I’ve said far too often, the list goes on and on, but we both have a life to lead.

But What Can I Do About It?

PLENTY! In fact, so much that I’m writing a book on the subject.

But until that is released, one of the most important things you can do is to connect your IoT devices to the internet via a Virtual Private Network (VPN).

If you have been following me, you already know I think your computer, phone, and tablet should always and only connect to the internet via VPN. This encrypts data between your device and the internet.

Few people do the same for their IoT devices. But that is no different than locking the front door as you leave for vacation, but leaving the backdoor open.

Very few IoT devices have the ability to do VPN by themselves. No worries! You can configure your router to do the work for you.

Some Background on VPN for Routers

Not all routers have the ability to work with VPN. So if yours cannot, it is definitely time to replace it. Routers are a relatively low-cost item, and certainly far less costly than a data breach. Think draining your bank account, identity theft, someone buying a home using your ID, unauthorized credit card charges, and more.

I’m fond of ASUS routers. They are a high-quality prosumer product. For my example, I’m using their latest & greatest router, the GT-AXE11000. But they have several less expensive models that work exactly the same.

What needs to be done to secure your home and office IoT is to enable VPN on your router, then configure the router to connect your target devices to that VPN. In the case of my router, I can create up to 16 different concurrent VPN configurations, allowing me to balance security, performance, and apparent geo-location on a device-by-device basis.

Prerequisites:

  • A VPN account. There are literally thousands of VPN providers available. Most of them throw red flags for me. Many are criminals. I recommend NordVPN. Reasonable cost, allows multiple devices, consistently ethical, and they provide detailed instructions how to configure many routers to work with their service.
  • A router that can be configured to work with your VPN provider.

Step-By-Step Configure a Router For VPN

  1. Get a VPN account. For this example, I’m using NordVPN.
  2. Get a router that can be configured to work with your VPN provider. for this example, I’m using the ASUS GT-AXE11000.
  3. Open a new browser window to your VPN provider support page. They will have a VPN configuration file to be downloaded for upload to your router. Download the file.
  4. Connect and log in to the router control panel.
  5. In the router control panel, select the VPN tab or section. For my router, VPN is selected from the sidebar.
  6. Select the type of VPN to be used. For my router, the options are VPN Server, VPN Fusion, and Instant Guard. VPN Fusion is what is needed. Most other routers call this VPN Client.
  7. Scroll down to the Server List area. This is where you configure your various VPN setups.
  8. Tap the + button to create a new server.
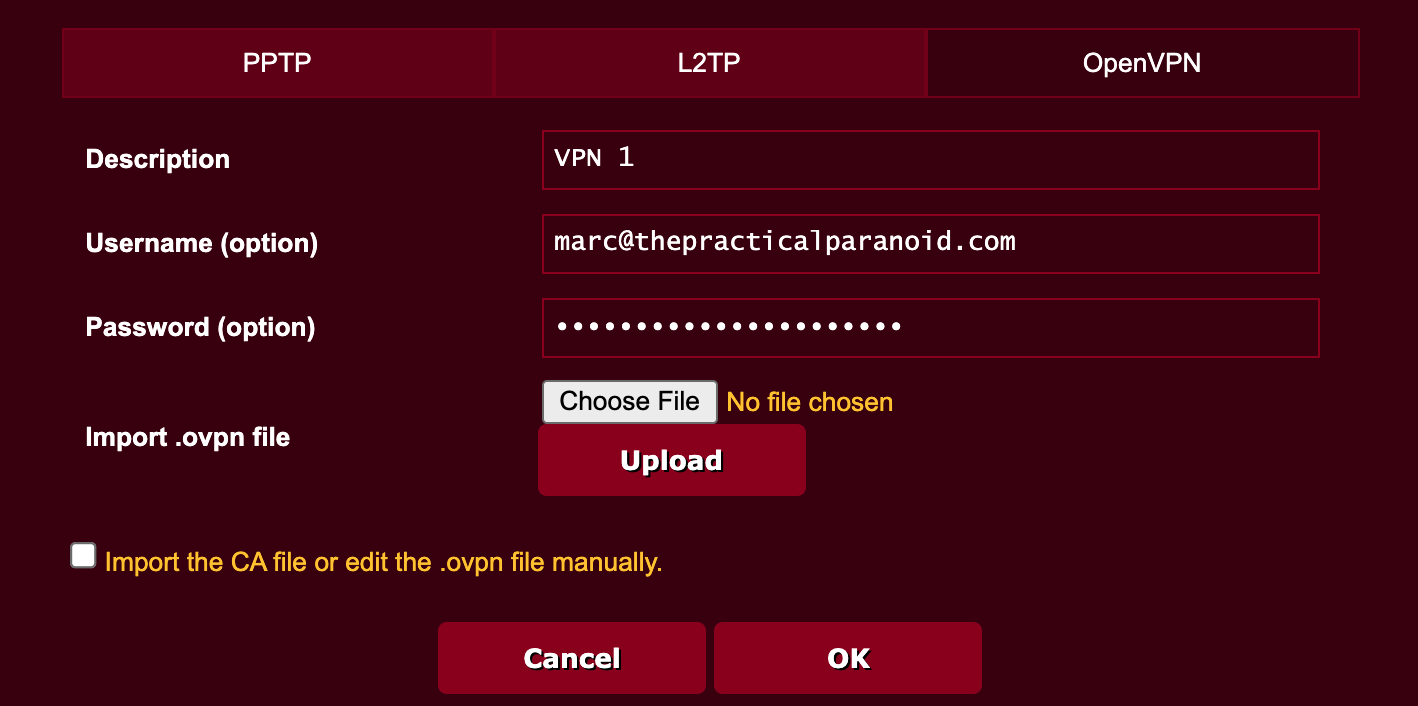
  9. Tap the VPN protocol you want to use. In most cases this is OpenVPN.
  10. Enter your VPN account credentials.
  11. Tap the Choose File button, then navigate to select the VPN configuration file downloaded from your VPN provider earlier in step 3.
  12. Tap the Upload button to install the VPN configuration file.
  13. Tap the OK button.
  14. Back to the router VPN page, you will see your new configuration listed. Tap the Activate button to enable the use of the configuration.
  15. Scroll down to the Exception List. This is where you assign devices. to use VPN.
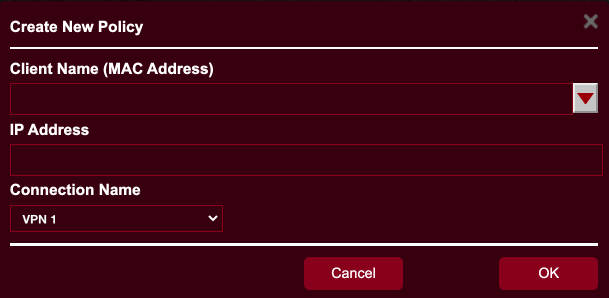
  16. Tap the + button. The Create a New Policy window opens. From here you select the target device(s).
  17. Tap the Client Name field. A list of all devices currently connected to the router appears. Select your target device. It will show in the Client Name field, and its IP address shows in the IP Address field.
  18. Tap the Connection Name field, then select the VPN configuration you created earlier.
  19. Tap OK.
  20. The device appears in the Exception List.
  21. Tap the Activate button to enable the device to use VPN.
  22. If you have additional devices you want to be connected to VPN, repeat steps 16-21.
  23. Tap the Apply button to save your work.
  24. The router will save the settings, then reboot.
  25. Once the router is back online, the target device(s) will be connected via VPN, secure from prying eyes.

Amazon Set to Share Your Internet With Neighbors – How to Opt Out

Amazon Set to Share Your Internet With Neighbors – How to Opt Out

Amazon Set to Share Your Internet With Neighbors – How to Opt-Out

Come this Tuesday, June 8, 2021, Amazon will launch the Amazon Sidewalk service. This service for Echo and Ring devices automatically opts-in to share your internet bandwidth with other Amazon devices in the neighborhood.

At first glance, this service is a great idea. Share a small slice of your internet bandwidth – 80Kb/s and a 500Mb monthly cap – with other Echo and Ring devices that have lost connection with their home wi-fi. For example, if your next door neighbors’ Ring doorbell loses connection with the home wi-fi, the Ring doorbell will automatically connect with the neighbor’s home wi-fi for uninterrupted service. Or if a dog wearing a Tile escapes from their yard, as long as the dog is within range of a network using Amazon Sidewalk, the Tile will accurately report the location of the dog.

Add on to this service that it is free to Echo and Ring customers (well, at least initially), and it is a great deal.

However, there are only a few big-tech companies that have proven to handle internet privacy responsibly, and Amazon is not one of them.

The Amazon Sidewalk white paper states that any sensitive data transmitted through Sidewalk is encrypted and that Amazon does not have a way to decrypt the packets. If that is true, they need to start hiring better engineers. Even if it is true, very serious hacks of secure systems is a daily news item.

Perhaps my biggest gripe is that the system is set to automatically opt-in. I’ll take this as tacit acknowledgement by Amazon the many/most of it’s customers would choose to opt-out instead.

What You Can Do – Opt-Out

If you have an eligible Echo or Ring device and do nothing, you are automatically part of the Amazon Sidewalk system.

If you prefer to not be a part of the Amazon Sidewalk system, follow these steps:

For Amazon Echo Device Owners

  1. Open your Amazon Alexa App.
  2. Select the More option in the bottom right corner of your screen.
  3. Select Settings > Account Settings > Amazon Sidewalk.
  4. Toggle the Amazon Sidewalk to Disabled.
  5. Close the Amazon Alexa app.

For Amazon Ring Device Owners

  1. Open your Ring app.
  2. Select the 3-line icon to open the menu, then go to Control Center > Amazon Sidewalk.
  3. Toggle the Amazon Sidewalk to Disabled.
  4. Close the Ring app.

Apple’s MagSafe Devices May Affect Pacemakers

Apple’s MagSafe Devices May Affect Pacemakers

Apple’s MagSafe Devices May Affect Pacemakers

As reported in the Journal of the American Heart Associationthe MagSafe wireless charging technology used in Apple’s latest iPhone 12 phones may interfere with cardiac pacemakers.

It was found that the additional magnet used in the new iPhones could cause interference when placed on the skin directly above the pacemaker, or approximately within 0.6″ of the pacemaker. Apple has an advisory stating the iPhone 12 does not pose a greater risk for magnet interference when compared to older generation iPhones.

If you have a pacemaker and use an iPhone 12, discuss the implications with your doctor.


Hiding in Plain Sight: Office 365 Email Encryption and Prevent Forwarding

Hiding in Plain Sight: Office 365 Email Encryption and Prevent Forwarding

Hiding in Plain Sight: Office 365 Email Encryption and Prevent Forwarding

Although over 1,200,000,000 people use Office 365, very few have discovered the pair of hidden gems. Well, not really hidden, just that very few people ever discover them!

The gems? Built-in email encryption and built-in block of forwarding.

That’s right, instead of spending time researching for an email encryption program, then figuring out how it works, if you have an Office 365 account with Outlook.com, you have both these features available with just a tap or two.

Send an Encrypted Email from Outlook.com

These gems are only available if you have an Office 365 account and use Outlook.com to send your mail with that account. It won’t work with your Outlook application, nor will it work with other email accounts (such as Gmail) that are linked to your Outlook account.

With those prerequisites out of the way, here is the answer you have been waiting for:

  1. Open a browser to https://outlook.com, then log in with your account.
  2. Create an email. Address the recipient to one of your other email addresses, or if performing this in class, to one of your study partners.
  3. From the toolbar, tap the Encrypt button > Encrypt, or Encrypt & Prevent Forwarding.


  4. Send the email.

Encrypt

When creating an outgoing email with Outlook.com, the user has the option to Encrypt the outgoing email.

On the recipient’s end, any attachments may be downloaded if using Outlook.com, Outlook application for Windows 10, the Outlook mobile app, or the Mail app in Windows 10. If using a different email client, a temporary passcode can be used to download the attachments from the 365 Message Encryption portal. The email itself remains encrypted on Microsoft servers and cannot be downloaded.

Encrypt & Prevent Forwarding

As with Encrypt option, when selecting Encrypt & Prevent Forwarding, the email remains encrypted on Microsoft servers and cannot be downloaded, copied, or forwarded. MS Office file attachments (Excel, PowerPoint, Word) remain encrypted after being downloaded. If these Office files are forwarded to someone else, the other person will not be able to open the encrypted files. Non-MS Office files can be downloaded without encryption and therefore forwarded without issue.

Read an Encrypted Email from Outlook.com

If Using Outlook.com to Read the Email

  1. Open a browser to https://outlook.com, then log in with the account set as the recipient in the previous assignment.
  2. Open the encrypted email. Note that you can open, read, and reply to this encrypted email as you can with unencrypted messages.

If Using Something Other than Outlook.com to Read the Email

  1. Open the email software to the account set as the recipient in the previous assignment.
  2. Open the encrypted email.
  3. You will see a message with instructions for how to read the encrypted message.

Google (Finally) Blocking Access to Android Advertising IDs

Google (Finally) Blocking Access to Android Advertising IDs

Google (Finally) Blocking Access to Android Advertising IDs

Well, maybe not Finally, but sometime in late 2021…

As reported in The Verge, Advertising ID’s are associated with every Android and iOS device. They are a unique identifier that links that device to web activity. It is primarily used to track your likes and dislikes and build a trusted profile of who you are.

Not something you or I ever agreed to or want.

Although Android devices have long been able to opt-out of personalized ads, (Settings > Google > Ads >Opt-Out), it doesn’t really stop developers from accessing and using your advertising ID (thank you for the transparency, Google).

Google support now states true opt-out will arrive in late 2021 for new Android 12 devices, and then roll out to all devices with Google Play in early 2022.

Apple iOS and iPadOS have a similar setting, but instead of being an option to opt-out, it is set to automatically opt-out, with the option to opt-in.

What You Can Do

For over eight years Practical Paranoia Security Essentials have been the best-selling, easiest, and most comprehensive DIY guides to ensuring your, your family, and your business cybersecurity and internet privacy. With illustrated step-by-step instructions for every aspect of security.

Paperback available from Amazon and all fine booksellers.

Kindle available from Amazon.

Live! pdf version available from The Practical Paranoid.

Practical Paranoia macOS 11 Security Essentials Version 5.0.2 Released

Practical Paranoia macOS 11 Security Essentials Version 5.0.2 Released

Practical Paranoia macOS 11 Security Essentials Version 5.0.2 Released

The best-selling, easiest, and most comprehensive cybersecurity and internet privacy DIY book series for home and business have just released version 5.0.2 for macOS 11.

This includes all updates relevant to macOS 11.4 plus the major changes for performing encrypted bootable clone backups.

How to Update

As with all Practical Paranoia books, the Live! version (pdf) is available immediately. If you have purchased the Live! version, it will automatically open to the new version.

The paperback and Kindle versions will be available on June 5, 2021. To receive your free Kindle update, delete the currently installed version of the book from your Kindle device, and then download it from your Kindle library.

How to Purchase

if you don’t already have a copy of Practical Paranoia Security Essentials for Android, Chromebook, iOS, macOS, or Windows, you can purchase from:

Paperback is available from Amazon and all fine booksellers.

Kindle is available from Amazon. Updates are always free.

Live! is available direct from The Practical Paranoid, LLC. Updates are always free and automatic.


New macOS Malware Breaks Apple Security To Take Photos

New macOS Malware Breaks Apple Security To Take Photos

New macOS Malware Breaks Apple Security to take Photos

New spyware has been discovered that can bypass built-in macOS security and privacy feature called Transparency Consent and Control. This is the feature that alerts the user when an app tries to do something that may impact the users’ privacy–such as recording keystrokes or taking a photo–asking for user permission before the action can take place. This malware is able to hijack other apps’ permissions to be used as its own authorization.

As an example, the malware could hook into Zoom, which had previously been granted permission to perform screen recording, to then allow the malware to record the users’ screen, and then send the recording to the malware developer.

What You Can Do About This Issue

This vulnerability has been fixed in macOS 11.4.

  1. On your Mac, open Apple menu > About This Mac.
  2. If your macOS version is 11.4, you are safe from this vulnerability and can stop here. If your macOS version is NOT 11.4, continue…
  3. On your Mac, open Apple menu > System Preferences > Software Update.
  4. Tap the Update Now button.
  5. Follow the onscreen instructions to download and install macOS 11.4.

More Reasons to Ditch Your Browser Extensions

More Reasons to Ditch Your Browser Extensions

More Reasons to Ditch Your Browser Extensions

As reported today, May 26, 2021 in the Record, a paper presented at the MADWeb workshop at the NDSS 2021 security conference, researchers from the CISPA Helmholtz Center for Information Security analyzed 186,434 Chrome browser extensions, finding 2,485 that disabled at least one security header used by the top 100 most popular websites.

Security headers are a server response to the browser request that allows site administrators to enable security features inside the browser or other client applications. the most common security headers include the ability to have a site work via an encrypted HTTPS connection, protecting users from cross-site scripting attacks, and that code running inside iframes can’t steal browser data.

What We Can Do About The Issue

Unfortunately, the list of culprit extensions is not included in the report, nor was any significant work performed on Firefox extensions. However, this serves as a solid reminder to keep browser extensions to the bare minimum.

  1. Open your browser to the Extensions page.
  2. Research each found extension.
  3. If the extension is from a suspect developer or does not provide essential services to you, delete the extension.
  4. Repeat for each browser in use.

The research paper titled First, Do No Harm: Studying the manipulation of security headers in browser extensions is available here.


Using a Weak Wi-Fi Password Leads to Arrest

Using a Weak Wi-Fi Password Leads to Arrest

Using a Weak Wi-Fi Password Leads to Arrest

As reported in BBC News today, in January 2021, a couple was arrested for posting images of child abuse online. The couple has denied any involvement with the images and posting.

After five months of investigation and “utter hell”, the case has been dropped.

Although it cannot be proven, it appears that because the couple never changed the Wi-Fi and router default passwords, the actual criminals were able to gain control over their home router, allowing the criminals to post the images while making it appear to have been done by the router owners.

This is in no way a unique or isolated case. 

A few years back I was living in an apartment. I noticed one of the many Wi-Fi SSID’s in the complex was without a password. After logging into the network, I found only two devices – a Windows PC and a printer. The PC was without a password as well!

Using my laptop while walking around the complex to measure Wi-Fi signal strength, I was able to find the apartment hosting the passwordless router. I introduced myself to the couple, that I was a cybersecurity professional, and happened to notice that their Wi-Fi had no password, which put their data and communications in a highly vulnerable position.

The husband became absurdly irate, ranting that he was the IT Security Manager for the Rio Rancho Police Department, and if anyone knows how to “do this”, he does.

Having done my due diligence, I apologized for disturbing them, and returned to my apartment.

Back at my computer, I logged into their network for a last time, and left a note on his PC desktop, reminding him that his, his wife’s, and the RRPD data were at risk.

Within an hour the network was secured.

A quick internet search will find you the default passwords for almost any type of device with internet connectivity. The majority of users never change their default passwords. Doing so is the equivalent of sending smoke signals with everything done on the network.

How about putting it on the calendar that next Monday, all default usernames and passwords are changed for:

  • Routers
  • Modems
  • Wi-Fi Base Stations
  • Smart Thermostats
  • Smart Security Systems
  • Smart Doorbells
  • Smart Keylocks
  • Even items like your smart refrigerator

When resetting passwords, remember to give a unique password to every device, site, and service, and passwords should be a minimum of 15 characters. To make remembering all of these passwords easy to recall, install Bitwarden on all of your computers, mobile phones, and tablets. 

100 Million Android Users Hit by Cloud Leaks

100 Million Android Users Hit by Cloud Leaks

100 Million Android Users Hit by Cloud Leaks

As reported by The Threat Post, Check Point Research has found 23 Android mobile apps, with a total of more than 100 million Android users, that are leaking personal data due to cloud server “misconfigurations” (my emphasis. As most of the developers have not fixed their “misconfiguration” after being notified, it is possible the more accurate term is “malicious sloppiness”).

These apps would require the user to provide some information – for example, a taxi app had chats between the driver and client, a horoscope app requested significant personal data from users in order to read their futures).

Due to the server misconfigurations, it was possible for just about anyone to access the personal information provided by the users in real-time. This creates an environment in which the server can be weaponized to inject data from the criminal hacker into the data stream between the user and service. For example, fake chat messages, fake “I’ll pick you up at 4th and Holland in 5 minutes” chats, phishing links, data harvesting, and more – all within a legitimate app.

Imperva Research Labs reports that data-leakage events have increased over 500% in the past year.

What To Do

There is little the end-user can do, as the data is on a server that you and I have no control over. However, there are fast and easy steps we can all do to help prevent our data leaking from cloud servers:

  • Only install those apps that are needed. Review every app on your phone and tablet. If it is not serving a necessary purpose, remove it.
  • If an app requires Security or Challenge Questions from you, provide false answers. For example, if a security question is What city were you born in? Instead of answering with the actual city, answer with something like Stairs. Should criminals access your data, such answers will provide no benefit to them.
  • If an app or cloud service offers Two-Factor Authentication, use it. This provides a belt-and-suspender approach to your data security.
  • If an app or cloud service does not offer Two-Factor Authentication, find an alternative that does, or failing that, contact the developer to make known how important such security is to you.
  • Configure your mobile device and app permissions such that apps can only access your location, microphone, screen, camera, etc. when you approve of the access, not all of the time.
  • Make a note on your calendar to check out https://haveibeenpwned.com on a monthly basis. This site maintains a database of breached internet accounts. If one of your accounts has been breached, this site will let you know, so that you may be able to take action.

Next Steps

Cybersecurity and internet privacy is a constant cat-and-mouse game. But once you know how to play the game, it is far easier than stressing over the possibilities, and can even be fun!

For over eight years Practical Paranoia books and workshops have brought cybersecurity and internet privacy to colleges, high schools, trade schools, government facilities, and most importantly–the home and business user.

Guaranteed to be the fastest, easiest, and most comprehensive guides and workshops of their kind.

Visit https://thepracticalparanoid.com to learn how you can secure your, your family, and your business information and privacy in just a few hours, and for 1/10 the cost of hiring a cybersecurity professional.

More Reasons to Ditch Your Browser Extensions

Linux on Chromebook is Exiting Beta

Linux on Chromebook is Exiting Beta

Google announced today that Linux on Chromebooks is finally coming out of beta with the next release of Chrome OS (v91).

If you are a Chromebook user, this is GREAT news.

I’m a huge proponent of Chrome OS. Although not the best solution for some users, for many (most?) folk, it is an ideal solution.

Chrome OS offers:

  • Good performance…
  • on minimal hardware…
  • which significantly reduces the price of the machine.
  • Great security.
  • In the event of catastrophic corruption, has the fastest and easiest system reset of any computer.

When the very simplified Chrome OS doesn’t offer what you need, you can install Android 11 compatible apps. And when the apps don’t offer what you need, you can jump right into Linux.

In many ways, using a Chromebook is like having the best of three worlds on just one inexpensive laptop.

Enable Linux on Chrome OS

If you are a Chrome OS user that hasn’t yet explored Linux, you don’t have to wait for the next OS update to use Linux. It is already on your machine just waiting to be released. The following are excerpts from the Practical Paranoia Chromebook Security Essentials book and workshop.

Assignment: Enable Full Linux

In this assignment, you enable the full version Linux on your Chrome device.

  • Prerequisite: A Chrome device that can run Linux.
  • Prerequisite: Fully updated Chrome OS.

Update Chrome OS

  1. Go to Settings > About Chrome OS > Check for updates.
  2. Install all available updates.

Enable Linux Support

  1. Go to Settings > Developers > Turn On.
  • If you do not see Linux in Settings, your device is not compatible with Linux. It may be time to upgrade to a newer device.
  1. In the Set-up Linux (Beta) on your Chromebook, select Next.
  2. Enter a username, set the Disk size, then select It may take up to 30 minutes to install.
  3. When a black window opens, you now have Linux installed! This black window is called the Terminal. It is where commands are typed/entered.

Update Keys

We need to verify all security keys used to install Linux updates are up to date.

  1. In Terminal, enter the following. When done, tap the Enter key. When your username reappears in the Terminal, the command has been completed:
sudo apt-key adv --refresh-keys --keyserver keyserver.ubuntu.com

Update Packages (Software, Dependencies, etc.)

  1. In Terminal, enter the text below, followed by the Enter key.  Try to commit this to memory. This is how you always update & upgrade Linux and associated software.
sudo apt update && sudo apt upgrade

Assignment: Give Linux Access to Downloads and Google Drive

By default, Linux is restricted to accessing only the files in the Linux folder. To make it more usable on your device, give it access to your Downloads folder and Google Drive.

  1. Open Files.
  2. Right-tap on Downloads > Share with Linux.
  3. Right-tap on Google Drive > Share with Linux.

What Else Can You Do in Linux

As great as Chrome OS is, sometimes you just need a quality word processor or the desktop version of a web browser, perhaps the security and privacy of the Signal Messenger? All of this and much more are available through Linux on Chrome OS.

As one example, let’s install LibreOffice (a direct competitor to Microsoft Office, free, open-source).

Assignment: Install LibreOffice on Linux

LibreOffice is an open-source replacement for Microsoft Office. By installing it, you have a full-featured word processor application on your device.

  1. Verify all upgrades and updates are applied to Linux. Enter the text below, followed by the Enter key:
sudo apt update && sudo apt upgrade
  1. Verify all repository keys are current. Enter the text below, followed by Enter:
sudo apt-key adv --refresh-keys --keyserver keyserver.ubuntu.com
  1. In Terminal, enter the text below, followed by Enter.
sudo apt install libreoffice -y

Explore Libre Office

When you install a Linux application, it is a full desktop app, running under the Linux operating system, not under the Chrome browser user interface.

  1. Open Libre Office by going to Launcher > (you may need to expand the Launcher window) > Linux apps > Libre Office.
  2. Set the default text format to MS Office .docx. In Libre Office, go to Tools > Options > Load/Save > General > Document type > Text document, then to Always save as > Word 2007-2019 (*.docx). When done, select
  3. Set the default spreadsheet format to MS Office .xlsx. In Libre Office, go to Tools > Options > Load/Save > General > Document type > Spreadsheet, then to Always save as > Excel 2007-2019 (*.xlsx). When done, select OK.
  4. Take a few minutes to explore the menu structure and interface of Libre Office. While not quite the same as Microsoft Word, most people feel at home after a few hours working in it.

Secure Your Chromebook, Communications, and Your Privacy

Take the next step to secure your digital life. Practical Paranoia Chromebook Security Essentials is the fastest, easiest, most comprehensive, and fun book and workshop available. We Guarantee it!

It’s Time to Upgrade Your Router

It’s Time to Upgrade Your Router

It’s Time to Upgrade Your Router

Chances are there are a couple of things about your current router that you would be much better off without.

But first, let’s discuss what is a router!

What Is a Router

A router is a hardware device that allows two networks to communicate with each other. The most common example is the router in your home or office, which allows your Local Area Network (LAN) to communicate with the Wide Area Network (WAN) provided by your Internet Service Provider. Without your router, it is likely all of the devices within your home or office would still be able to print and file share amongst each other, but browsing the internet, sending and receiving email, and even watching Netflix would not be possible.

Routers may provide connection to your LAN devices via ethernet (wired) or Wi-Fi (wireless).

Router Performance

A router may also be the weak point for both security and speed.

Lower-end or older routers are designed to work with just a few LAN devices. As the number of LAN devices increases, the router chipset becomes stressed attempting to handle the additional work. This results in slower network and internet speeds, router freezes, and odd behaviors like not allowing some devices to connect.

Higher-end and newer routers are designed to handle more LAN devices without overstressing the chipset.

How many devices do you currently have on your network? It’s quite easy to blow past the 5-10 devices your router is likely designed to handle. For example, in my two-person home we have:

  • 6 computers
  • 1 smartwatch
  • 3 smartphones
  • 2 printers
  • 4 security cameras
  • 1 security doorbell
  • 1 hot water tank leak detector
  • 6 smartTV’s

For a total of 24 devices on our Wi-Fi network.

Once you add in visiting friends or a business meeting, where each person may come with 2-3 devices (smartwatch, computer or tablet, and smartphone), and those numbers can easily hit 50+ devices.

If you have been unhappy with your LAN or WAN performance, the solution may be as simple as a new router that can easily handle all your devices.

Router Security

As is typical, security is my bigger concern.

Older routers are designed with WPA or WPA2 (Wi-Fi Protected Access). This protocol is intended to help keep all Wi-Fi data secure. But as you know, security and privacy are a cat-and-mouse game. WPA is now easily cracked and should never be used. WPA2 can be cracked, although it takes some determination.

In January 2018, WPA3 was released. To date, it is the most secure option available and is generally considered uncrackable (although testing has found some flaws). If your router has WPA3, network security should no longer be your biggest concern.

Modern Router Performance and Security

With routers that have first been available for sale since 2018, WPA3 security is included. So any modern router has the best security built-in.

In addition to WPA3 security, modern routers that have first been available for sale since March 2021 will have a huge performance boost in the form of 802.11ax (Wi-Fi 6). Wi-Fi 6 not only has faster performance overall than the previous 802.11ac but can handle far more devices and traffic without stress. In fact, with a Wi-Fi 6 router, your Wi-Fi 6 devices can communicate faster over Wi-Fi than over ethernet (based on proximity).

There is a recent update to Wi-Fi 6 called Wi-Fi 6E. Wi-Fi 6E includes a frequency range that hasn’t been used before (6GHz). If you have new devices that can operate on that frequency, they can operate even faster as their channel won’t be congested and competing with other devices.

At the moment, there are only a few devices that are capable of using Wi-Fi 6E, but most new devices from now on will include it.

Finding a Wi-Fi 6 or 6E Router

Browsing over to Amazon, then searching for “router Wi-Fi 6” will display most of the current crop of routers. There are more than a dozen quality manufacturers, but my preference for most home and small-medium-sized businesses is ASUS. ASUS is consistently among the top-rated for:

  • Quality parts
  • Quality construction
  • Overall performance
  • Features
  • Security

High-End

At the top of the heap is the ASUS GT-AXE11000. It simply doesn’t get any more secure, faster, or more expensive than this. This unit is tri-band, including 2.4 GHz, 5 GHz, and 6 GHz, making it future-proof (well, when it comes to technology, that means it should serve you well for the next 5 years). As with all of the better ASUS products, it includes Trend Micro security, automatically checking for malware, malicious websites, and other things that cause me nightmares.

Midrange

The ASUS GT-AX11000 is the GT-AXE11000’s little brother. They look similar and have similar specs. Where the AX11000 is different is that its tri-band is 2.4 GHz, and two 5 GHz bands. Having two 5 GHz bands will make this unit a better solution today (as there are so few 6 GHz devices to connect with it), but it isn’t future-proof. As you replace your current devices (computers, tablets, phones, etc.) the new devices will be 6GHz.

Low-End

If your needs are modest and have only around 5-10 devices to connect to your router, you will be quite happy with the ASUS AX6100 router. As with my other two choices, this comes with Trend Micro security, and is tri-band, with 2.4 GHz, and 2 5 GHz bands.

Configuring Your Router

If there is a downside to using a better router, it is that they are not plug-and-play. They do require a small bit of configuration. But it is nothing you can’t do with a little help from your friends 😉

Although every router configuration portal is different, I’ll show how the GT-AXE11000 looks.

  1. Connect the router to your network.
  2. Open a browser, then enter the router IP address. The router authentication screen opens.
  3. Enter the router default administrator name and password, then tap OK.
  4. In the configuration portal, from the sidebar, select Wireless. The main area of the page allows the configuration of the three bands (in this case, 2.4 GHz, 5 GHz, and 6 GHz).
  5. For each of the bands, in the Authentication Method areas, select WPA3 Personal.
  6. Tap the Save button, then exit from the configuration portal.
  7. On each of your devices that will connect via Wi-Fi to the router, you will need to reconnect by selecting the Wi-Fi network, enter the password, then tap OK or Connect.
  8. That’s it! See, not so tough.
Practical Paranoia Security Essentials v5.0.1 Released

Practical Paranoia Security Essentials v5.0.1 Released

Practical Paranoia Security Essentials version 5.0.1 released

WAHOO!!! We have reached a new milestone with Practical Paranoia. All five books (Android 11, Chromebook, iOS 14, macOS 11, and Windows 10) have been updated to version 5.0.1. With this update, all books now have:

  • Synchronized chapters, sections, and assignments. This means if you want to lock down your security and privacy on both your Windows laptop and Android phone, and perhaps your mother’s Chromebook and iPhone, each chapter for each book will be identical with the exception of the specifics of the device being worked on.
  • Chapter timings have been added. For those taking the live or prerecorded Practical Paranoia workshops, you now know going in how long it will take to complete a chapter, and approximately how long the homework will take.

Synchronization is huge. To accomplish it, we started from scratch to rewrite each book. But the results are amazing. For someone wanting to learn about more than one platform, this literally cuts learning time by 50-75%.

This makes Practical Paranoia Security Essentials not only the easiest and most comprehensive cybersecurity and internet privacy guide available for a regular end-user, but it is now the fastest available.

Look Inside Practical Paranoia Security Essentials v5.0.1

Download the Look Inside preview of Practical Paranoia Security Essentials v5.0.1, and discover why this is the easiest, most comprehensive, fun, and fastest way to harden your cybersecurity and internet privacy. 

FBI Reports Cybercrime Up 100% in Last 14 Months

FBI Reports Cybercrime Up 100% in Last 14 Months

Cybercrime Doubles in 14 Months

As reported by Bleeping Computer, the FBI’s Internet Crime Complaint Center (IC3) is reporting in their 2020 Internet Crime Report a 100% increase in cybercrime in the past 14 months.

According to the report, the top three US public losses come from:

  • $1.8 B to Business Email Compromise scams. These scams are when an email is received from what appears to be a known source making a legitimate request. For example:
    • A vendor sends an invoice with an updated mailing address.
    • A company executive asks their assistant to purchase dozens of gift cards as employee rewards, and asks for the serial numbers so they can email them to employees right away.
    • A homebuyer receives a message from their title company with instructions how to wire a down payment.
  • $600 M from romance scams.
    • These often start with text messages or emails from dating services or social media. As attachment builds, requests for money “for my ill mother”, or perhaps “to purchase airline tickets to see you.”
  • $336 M in investment fraud.

How to Protect Yourself

From the FBI Scams and Safety website:

  • Limit what you share online and in social media. Even apparently insignificant information such as pet names, schools attended, and birthdate can give the scammer the info they need to guess your password or answer your security questions.
  • Don’t click on anything asking you to update or verify account information. Instead, call the company first to ask if the request is legitimate.
  • Carefully examine the email address in correspondence. Scammers use slight differences to trick your eye and gain trust.
  • Be careful of what you download. Never open an email attachment from someone you don’t know, and be wary of attachments forwarded to you.
  • Set up 2-Factor Authentication for every account that allows it.
  • Verify payment and purchase requests in person if possible or by calling the person. to make sure it is legitimate.
  • Be especially wary if the requestor is pressing you to act quickly.

From The Practical Paranoid Workshops and Books:

  • Install quality anti-malware.
  • Configure your email with Sender Policy Framework (SPF), Domain Keys Identified Mail (DKIM), and Domain-based Message, Authentication, Reporting & Conformance. This will eliminate the largest of the problems–Business Email Compromise.
  • Get a life. This will eliminate the second largest of the problems–romance scams. (Honestly, I say this from. the heart, not to be snarky).
  • Ensure your browser connects to secure HTTPS sites, not insecure HTTP sites. Using Brave browser or installing HTTPS Everywhere on your current browser helps to do this.
  • Lock down all your social media so that only those you know can see the very little personal information you put there.

Not Sure How To Do All of This?

It’s your lucky day. The Practical Paranoia books and workshops are the fastest, easiest, most comprehensive path to cybersecurity and internet privacy. We hold your hand while you secure your computers, tablets, smartphones, data, communications, and entire internet experience.

Visit https://thepracticalparanoid.com to start securing your privacy immediately!


iOS 14.5 Update is Vital to Your Security & Privacy

iOS 14.5 Update is Vital to Your Security & Privacy

Apple recently updated iOS 14 and iPadOS 14 to version 14.5. Although there are many tweaks included with this update, by far the most important to your cybersecurity and internet privacy is the addition of App Tracking Transparency.

App Tracking Transparency lets you control which apps are allowed to track your activity across other companies’ apps and websites for ads or sharing with data brokers. 

In other words, you get to decide if your activity on one site can be viewed across other websites. In case you had been wondering what all of the recent Facebook versus Apple battle cries have been about–this is it.

Giving the end-user the authority to block this activity is a major victory for us. Important enough to give Apple a significant moral high ground. So much so that Google announced today they will be implementing the same protections within a year.

ENABLE APP TRACKING TRANSPARENCY

  1. Verify your iPhone or iPad isat version 14.5 or higher. Tap Settings > General > Software Update. If your current version is not at least 14.5, continue. If your current version is at least 14.5, skip to step 3.
  2. In the Software Update screen, tap the Update button, then follow the onscreen directions to update iOS or iPadOS.
  3. To enable App Tracking Transparency, tap Settings > Privacy > Tracking. The Tracking screen opens:
  4. If you disable Allow Apps to Request to Track, you flat-out block the option, and (at least in theory) your activities on one site will not be available to other sites or data brokers. If you enable this setting (as I have done in the example above), then sites must pop up a dialog requesting that you opt-in to allow them to track. Each site will have their own style to doing this. Below is what I received from CNN:


  5. The upshot is that if you allow apps to ask if they can track you, you have the option on a site-by-site basis of giving a thumbs-up or thumbs-down.

You don’t need to be an Apple Genius, Google Guru, or Microsoft Engineer to help ensure your cybersecurity and internet privacy. You just need to know how. 

Designed for the non-technical user, Practical Paranoia has been providing the easiest and most comprehensive step-by-step guides for home and office security and privacy for over eight years. Secure your privacy now at https://thepracticalparanoid.com.

Firefox 88 Enables JavaScript Embedded in PDFs by Default

Firefox 88 Enables JavaScript Embedded in PDFs by Default

As reported in Slashdot today…

Firefox has included a built-in PDF viewer for a long time, eliminating the need to install another third-party extension. Until now, this viewer has had its ability to execute JavaScript embedded in PDFs disabled.

This is important. JavaScript in PDF was originally designed to create self-validating forms but has a long history of being abused by criminal hackers to penetrate your computer security to harvest what is for the taking on your device.

Starting with the newly-released Firefox 88 (desktop version), this has been changed so that the default setting is to enable the execution of JavaScript embedded in PDF files.

Resolving this is easy and simple. To help ensure your cybersecurity and internet privacy, let’s do so now.

Disable Firefox 88 and Higher Execution of JavaScript Embedded in PDF Files

  1. Open Firefox.
  2. (MacOS) Select Firefox menu > About Firefox.
    (Windows) Select 3-Line menu > Help > About Firefox.
  3. Verify you have the latest version of Firefox installed. As of this writing, that is version 88.
  4. Close the About window.
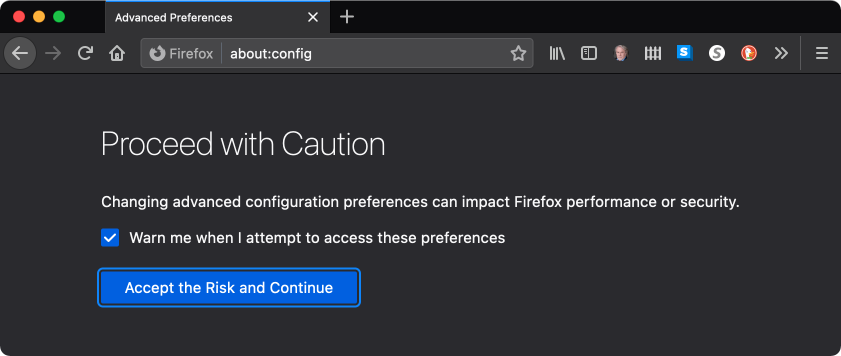
  5. Enter the following in the address bar: about:config. The Proceed with Caution window opens.
  6. Tap the Accept the Risk and Continue button.
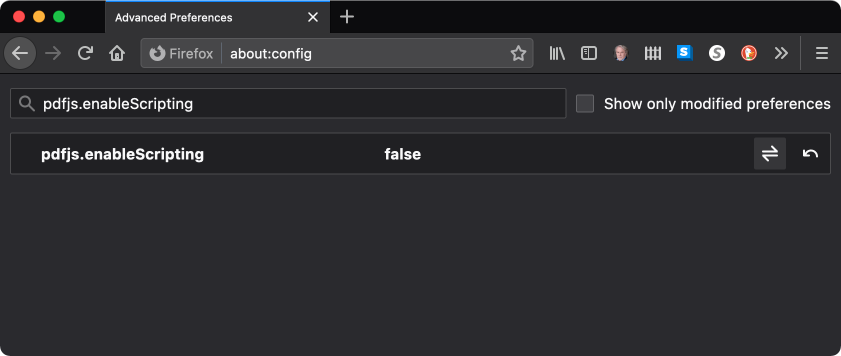
  7. Enter the following in the search field: pdfjs.enableScripting
  8. The default setting is True. Tap the switch icon to the far right to change the setting to False.

  9. Close the window.
  10. Ahhh. I don’t know about you, but I feel so much better now!
8 Years Running

8 Years Running

For over 8 years The Practical Paranoid has been bringing you the best-selling, easiest, step-by-step, most comprehensive guides and training to ensuring your security and privacy.
  • Available in paperback, kindle, and Live editions.
  • And still the only books and trainings GUARANTEED to be the best!
  • Learn how you can take control over your security and privacy, and stop them from accessing your data and communications.

Visit The Practical Paranoid LLC at https://thepracticalparanoid.com, or speak to a human at +1.505.453.0479

Practical Paranoia macOS 11 Security Essentials Hits the Bookstores

Practical Paranoia macOS 11 Security Essentials Hits the Bookstores

Practical Paranoia macOS 11 Security Essentials Hits the Bookstores

We’re Baaaack!

The best-selling DIY cybersecurity book series is back, fully updated, and guaranteed to be the easiest, most comprehensive book to secure your home and office computers, tablets, and smartphones.

Available now in paperback and Kindle from Amazon, paperback from all fine booksellers, and Live! directly from the the publisher.

Visit The Practical Paranoid to order your copy, and secure your computer, data, and privacy now!


Is it Time to Move from LastPass to Bitwarden?

Is it Time to Move from LastPass to Bitwarden?

For years I have recommended the use of a password manager to help generate and store strong passwords. My go-to product has been LastPass. But now that LastPass has moved many of their features away from their free to their for-fee product, you may want to take a look at a competitor–Bitwarden.

I’ve been using Bitwarden for the past month on my Chromebook, iPhone, macOS 11 (Silicon), and Windows machines, and I’ve never been happier with a password manager.

If you aren’t familiar with a password manager, you are probably using one without even realizing it! Most browsers now have built-in password managers. So after you have been to a site once, your browser remembers your login credentials. On your subsequent visits, the browser will autofill these credentials so that you don’t have to remember them.

This browser-based password manager works well, but it can be much better. What Bitwarden brings to the table above and beyond the browser-based password managers includes:

  • Free and for-fee accounts, family accounts, and business accounts
  • Synchronize passwords across all devices
  • Synchronize passwords across Android, Chrome OS, iOS, iPadOS, macOS, and Windows devices
  • Strong password generator
  • Secure store of notes (such as Challenge Questions), and credit card information
  • Share passwords (for-fee accounts)
  • 2-Factor Authenticator (One-Time-Password Generator) (for-fee accounts)

It’s this 2-Factor Authenticator that really won me over. 2FA is currently the only method to effectively keep hackers out of your accounts. Every password can be cracked. But if you have 2FA enabled on an account, even if the bad agents know your username and password, they have no access to your account.

The problem with 2FA is that should your 2FA device (typically a smartphone) become damaged or lost, YOU will have a rough time gaining access to your own accounts.

Bitwarden solves this issue by sharing 2FA with your various devices that also have Bitwarden installed. It even automatically backs up your 2FA coding to the cloud (strongly encrypted, of course), so that it is easily accessible in case of loss.

Be forewarned, Bitwarden 2FA is not available on the free version. It will cost you $10/year to upgrade to their premium service.

Enough rambling. Time to upgrade your security and get Bitwarden running on your systems.

Install and Configure Bitwarden

To conserve space, my instructions will be based on macOS, but the process is almost identical on all platforms.

Although it looks like a lot of steps, I promise this is quick and easy. And once done, will save you a ton of time, and significantly hardens your security.

Download and Install

  1. Open a browser to https://bitwarden.com.
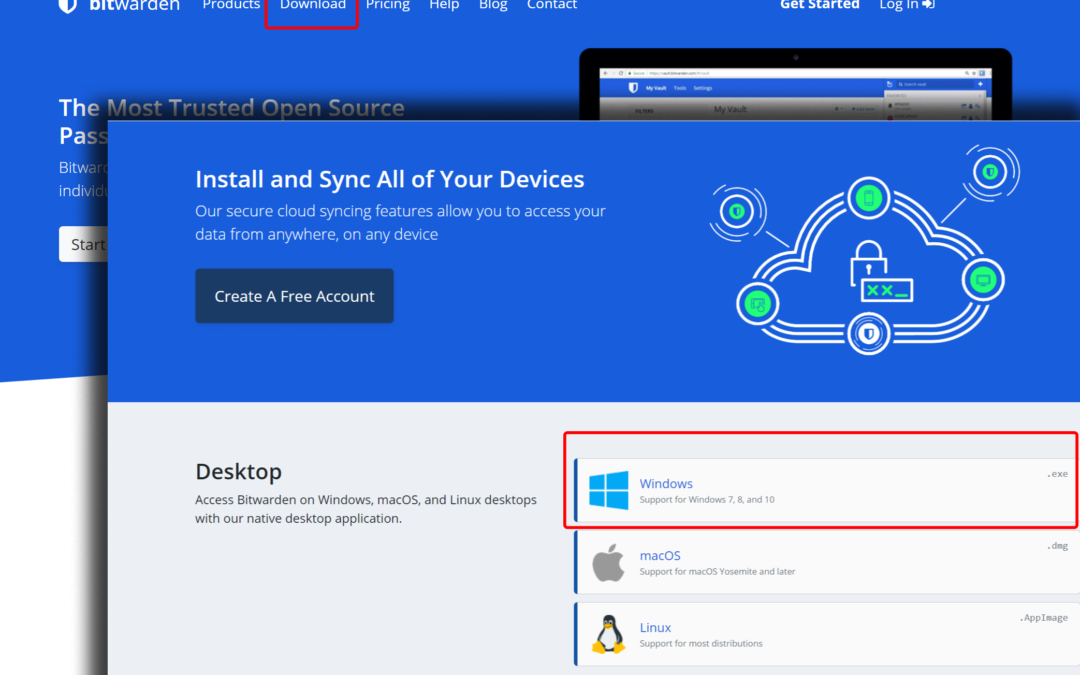
  2. Select Download.
  3. Select Create A Free Account. Follow the onscreen instructions to create your account. I recommend upgrading to Premium now so that you have immediate access to 2FA, but you can just go with the free account to test the waters.
  4. Return to the Download page, and then select your OS–Linux, macOS, or Windows.
  5. Download and install the app.
  6. Launch the app, and register with the account you created.

Configure

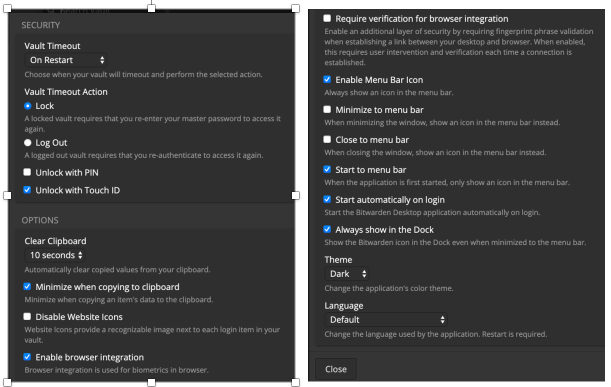
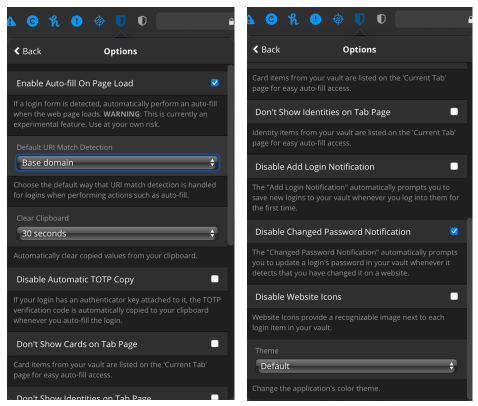
  1. Open Bitwarden Preferences. Configure to your taste. My recommendation is shown below. When complete, click Close.

Enable Two-Step Login

As the keys to your treasure are stored in this database, not only is a strong Bitwarden password important, but so is having Two-Step Login enabled.

  1. Open a browser to https://bitwarden.com.
  2. Log in.
  3. Select Settings > Two-Step Login.
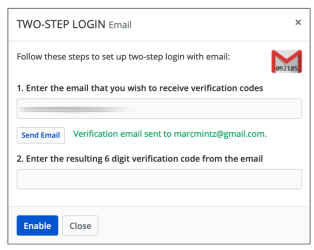
  4. Select your preferred method to get a verification code. In this example, I’m using Email.
  5. At the prompt, enter your email address, and then click Sent Email.
  6. Open your email to find the verification email.
  7. Copy the verification code from the email, paste it into the Bitwarden verification field, and then select Enable.

  8. At the confirmation dialog, select Close.
  9. In the Bitwarden Two-Step Login page, select View Recovery Code.
  10. Copy and then securely store your recovery code. This code will be vital if you lose access to your Bitwarden 2FA Authenticator. When done, select Close.

Install Browser Extensions

You are not set up with Bitwarden. The last step is to install a Bitwarden browser extension so that your database is accessible from your browser.

  1. Open a browser to https://bitwarden.com > Download.
  2. Select your desired browser. The extension will download to your system.
  3. Open the downloaded extension to install it in your browser.
  4. In your browser, select the extension icon in the toolbar > select Enable.
  5. At the prompt, enter your Bitwarden credentials to enable the extension.

Configure Browser Extension

  1. Select the browser extension to open it.
  2. Select Sync > Sync Vault Now to synchronize any stored data.
  3. Configure Vault Timeout to On Browser Restart, and Vault Timeout Action to Lock.
  4. Scroll down to select Options. Configure to your taste. When done, click outside of the Bitwarden window to close. My recommendation is shown below:

Adding Credentials to Bitwarden

You are now set and ready to go. You can manually enter credentials from the browser extension or the app. You can also visit a site, enter your credentials, and then reply Yes when Bitwarden prompts if you want to store the password (you could almost miss the prompt – it will be at the top of the window).

Configure Bitwarden Two-Step Authentication

2FA is absolutely vital to help ensure the security of your accounts. If a site offers 2FA (sometimes called Multi-Factor Authentication and 2-Step Verification), go for it.

Once 2FA is active on a site, you will need to provide a code provided by the 2FA source (in this case, Bitwarden) the first time you login to a new device or new browser. Some sites are configured to prompt for 2FA on every visit, once a week, or once a year. Let’s walk through getting your first 2FA configured in Bitwarden.

  1. Open a browser to your target site. In my example that will be Google. Their security page is https://security.google.com.
  2. In the main body area, scroll down to select 2-Step Verification. 
  3. At the prompt, enter your Google credentials, and then select Next.
  4. Scroll down to the Authenticator app section, and then select SET UP.
  5. At the Get codes from the Authenticator app, select the type of smartphone you use (Android or iPhone), and then select Next.
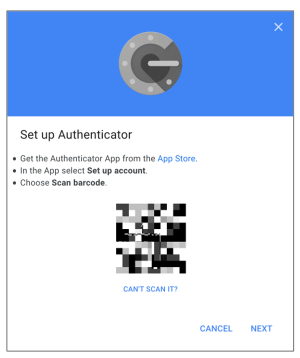
  6. In the Set up Authenticator window, it is designed to be captured with a smartphone camera. As we are using a computer, select CAN’T SCAN IT?

  7. In the Can’t scan the barcode? dialog, select and then copy the 32-character code.
  8. Open Bitwarden, select your Google account, and then select the Edit (pencil) icon.
  9. Paste the code copied in step 7 into the Authenticator Key (TOTP) field, and then click the Save (disk) icon.
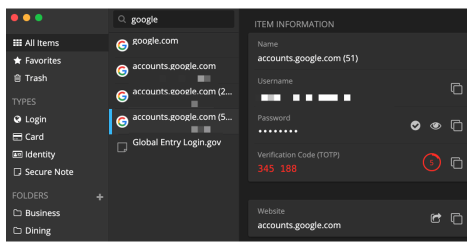
  10. In the ITEM INFORMATION area of your Bitwarden Google record, you will now see a Verification Code (TOTP) field. This is the one-time only authenticator code that can be used when prompted by Google. If you have other devices with Bitwarden, they will now also have this new field.