For years I have recommended the use of a password manager to help generate and store strong passwords. My go-to product has been LastPass. But now that LastPass has moved many of their features away from their free to their for-fee product, you may want to take a look at a competitor–Bitwarden.
I’ve been using Bitwarden for the past month on my Chromebook, iPhone, macOS 11 (Silicon), and Windows machines, and I’ve never been happier with a password manager.
If you aren’t familiar with a password manager, you are probably using one without even realizing it! Most browsers now have built-in password managers. So after you have been to a site once, your browser remembers your login credentials. On your subsequent visits, the browser will autofill these credentials so that you don’t have to remember them.
This browser-based password manager works well, but it can be much better. What Bitwarden brings to the table above and beyond the browser-based password managers includes:
- Free and for-fee accounts, family accounts, and business accounts
- Synchronize passwords across all devices
- Synchronize passwords across Android, Chrome OS, iOS, iPadOS, macOS, and Windows devices
- Strong password generator
- Secure store of notes (such as Challenge Questions), and credit card information
- Share passwords (for-fee accounts)
- 2-Factor Authenticator (One-Time-Password Generator) (for-fee accounts)
It’s this 2-Factor Authenticator that really won me over. 2FA is currently the only method to effectively keep hackers out of your accounts. Every password can be cracked. But if you have 2FA enabled on an account, even if the bad agents know your username and password, they have no access to your account.
The problem with 2FA is that should your 2FA device (typically a smartphone) become damaged or lost, YOU will have a rough time gaining access to your own accounts.
Bitwarden solves this issue by sharing 2FA with your various devices that also have Bitwarden installed. It even automatically backs up your 2FA coding to the cloud (strongly encrypted, of course), so that it is easily accessible in case of loss.
Be forewarned, Bitwarden 2FA is not available on the free version. It will cost you $10/year to upgrade to their premium service.
Enough rambling. Time to upgrade your security and get Bitwarden running on your systems.
Install and Configure Bitwarden
To conserve space, my instructions will be based on macOS, but the process is almost identical on all platforms.
Although it looks like a lot of steps, I promise this is quick and easy. And once done, will save you a ton of time, and significantly hardens your security.
Download and Install
- Open a browser to https://bitwarden.com.
- Select Download.
- Select Create A Free Account. Follow the onscreen instructions to create your account. I recommend upgrading to Premium now so that you have immediate access to 2FA, but you can just go with the free account to test the waters.
- Return to the Download page, and then select your OS–Linux, macOS, or Windows.
- Download and install the app.
- Launch the app, and register with the account you created.
Configure
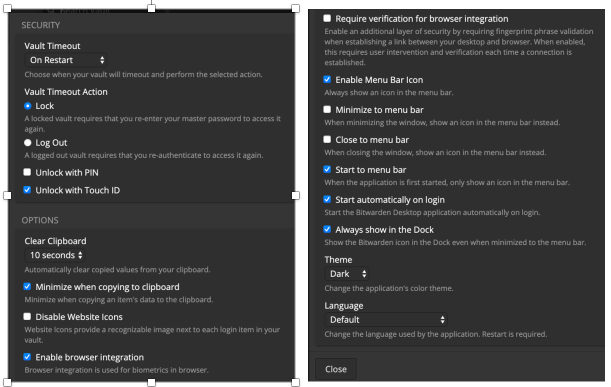
- Open Bitwarden Preferences. Configure to your taste. My recommendation is shown below. When complete, click Close.
Enable Two-Step Login
As the keys to your treasure are stored in this database, not only is a strong Bitwarden password important, but so is having Two-Step Login enabled.
- Open a browser to https://bitwarden.com.
- Log in.
- Select Settings > Two-Step Login.
- Select your preferred method to get a verification code. In this example, I’m using Email.
- At the prompt, enter your email address, and then click Sent Email.
- Open your email to find the verification email.
- Copy the verification code from the email, paste it into the Bitwarden verification field, and then select Enable.
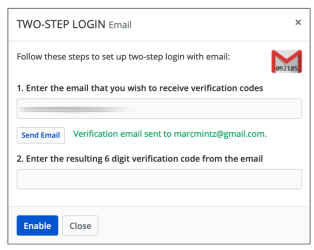
- At the confirmation dialog, select Close.
- In the Bitwarden Two-Step Login page, select View Recovery Code.
- Copy and then securely store your recovery code. This code will be vital if you lose access to your Bitwarden 2FA Authenticator. When done, select Close.
Install Browser Extensions
You are not set up with Bitwarden. The last step is to install a Bitwarden browser extension so that your database is accessible from your browser.
- Open a browser to https://bitwarden.com > Download.
- Select your desired browser. The extension will download to your system.
- Open the downloaded extension to install it in your browser.
- In your browser, select the extension icon in the toolbar > select Enable.
- At the prompt, enter your Bitwarden credentials to enable the extension.
Configure Browser Extension
- Select the browser extension to open it.
- Select Sync > Sync Vault Now to synchronize any stored data.
- Configure Vault Timeout to On Browser Restart, and Vault Timeout Action to Lock.
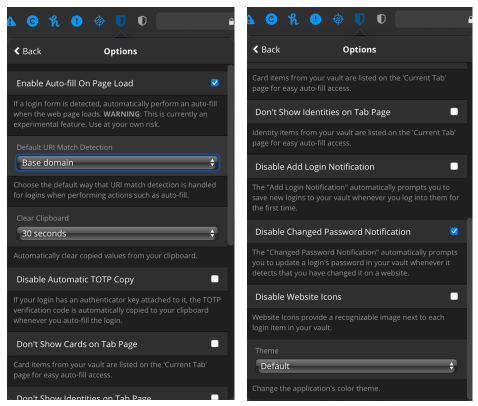
- Scroll down to select Options. Configure to your taste. When done, click outside of the Bitwarden window to close. My recommendation is shown below:
Adding Credentials to Bitwarden
You are now set and ready to go. You can manually enter credentials from the browser extension or the app. You can also visit a site, enter your credentials, and then reply Yes when Bitwarden prompts if you want to store the password (you could almost miss the prompt – it will be at the top of the window).
Configure Bitwarden Two-Step Authentication
2FA is absolutely vital to help ensure the security of your accounts. If a site offers 2FA (sometimes called Multi-Factor Authentication and 2-Step Verification), go for it.
Once 2FA is active on a site, you will need to provide a code provided by the 2FA source (in this case, Bitwarden) the first time you login to a new device or new browser. Some sites are configured to prompt for 2FA on every visit, once a week, or once a year. Let’s walk through getting your first 2FA configured in Bitwarden.
- Open a browser to your target site. In my example that will be Google. Their security page is https://security.google.com.
- In the main body area, scroll down to select 2-Step Verification.
- At the prompt, enter your Google credentials, and then select Next.
- Scroll down to the Authenticator app section, and then select SET UP.
- At the Get codes from the Authenticator app, select the type of smartphone you use (Android or iPhone), and then select Next.
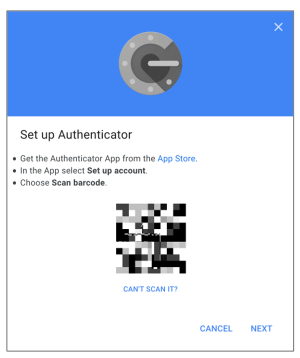
- In the Set up Authenticator window, it is designed to be captured with a smartphone camera. As we are using a computer, select CAN’T SCAN IT?
- In the Can’t scan the barcode? dialog, select and then copy the 32-character code.
- Open Bitwarden, select your Google account, and then select the Edit (pencil) icon.
- Paste the code copied in step 7 into the Authenticator Key (TOTP) field, and then click the Save (disk) icon.
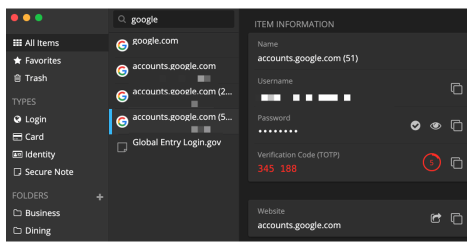
- In the ITEM INFORMATION area of your Bitwarden Google record, you will now see a Verification Code (TOTP) field. This is the one-time only authenticator code that can be used when prompted by Google. If you have other devices with Bitwarden, they will now also have this new field.