by Marc Mintz | Sep 19, 2022
Just when you thought it was safe to go back into the water.
Oh, wait. Wrong movie!
Do you have a credit card? Do you have a cell phone? Of course you do! And if a bad actor gains access to both of these, they have found an effortless way to gain full control over your credit card account.
The Hack
This hack was discovered when the bad actor was caught in the act at in the locker room of a gym. The process works like this:
- The bad actor (BA) opens lockers (at least at the gym) to gain physical access to then victims phone a credit card.
- BA uses their phone to attempt log in to your credit card account, tapping the “Forgot my password” or “Reset my password” button.
- An authorization code is sent to the victims cell phone.
- IF (big if) the victim has configured their phone to display messages while in Lock Screen mode, the authorization code is clearly visible to BA.
- BA enters the authorization code on their phone. This gives BA the opportunity to change your password, phone number, email address, and all other vital information.
- At this point, BA has full control over victims credit card account.
The Fix
Fortunately, the fix is straightforward and simple. All that need be done is to prevent messages from displaying on your Lock Screen. If you have followed me for any time, you know I’m a fan of not allowing ANYTHING to display on the Lock Screen.
For those of you who have just upgraded to iOS 16, this can be done from Settings > Notifications > Messages > disable the Lock Screen option. It is OK to leave Notification Center and Banner notification enabled.
For Android users, open Settings > Privacy > Notifications on Lock Screen > enable Don’t show notifications at all.
50% DISCOUNT ON ALL PRACTICAL PARANOIA BOOKS
IOS 16 AND IPAD 16 ARE NOW AVAILABLE
And so are the vulnerabilities to your device, data, and communications!
iOS 16 is the MUST HAVE upgrade for your iPhone and iPad. In addition to dozens of new features, iOS 16 has dramatically improved the options for your cybersecurity and internet privacy.
But you need to know HOW to properly configure your device to ensure your security.
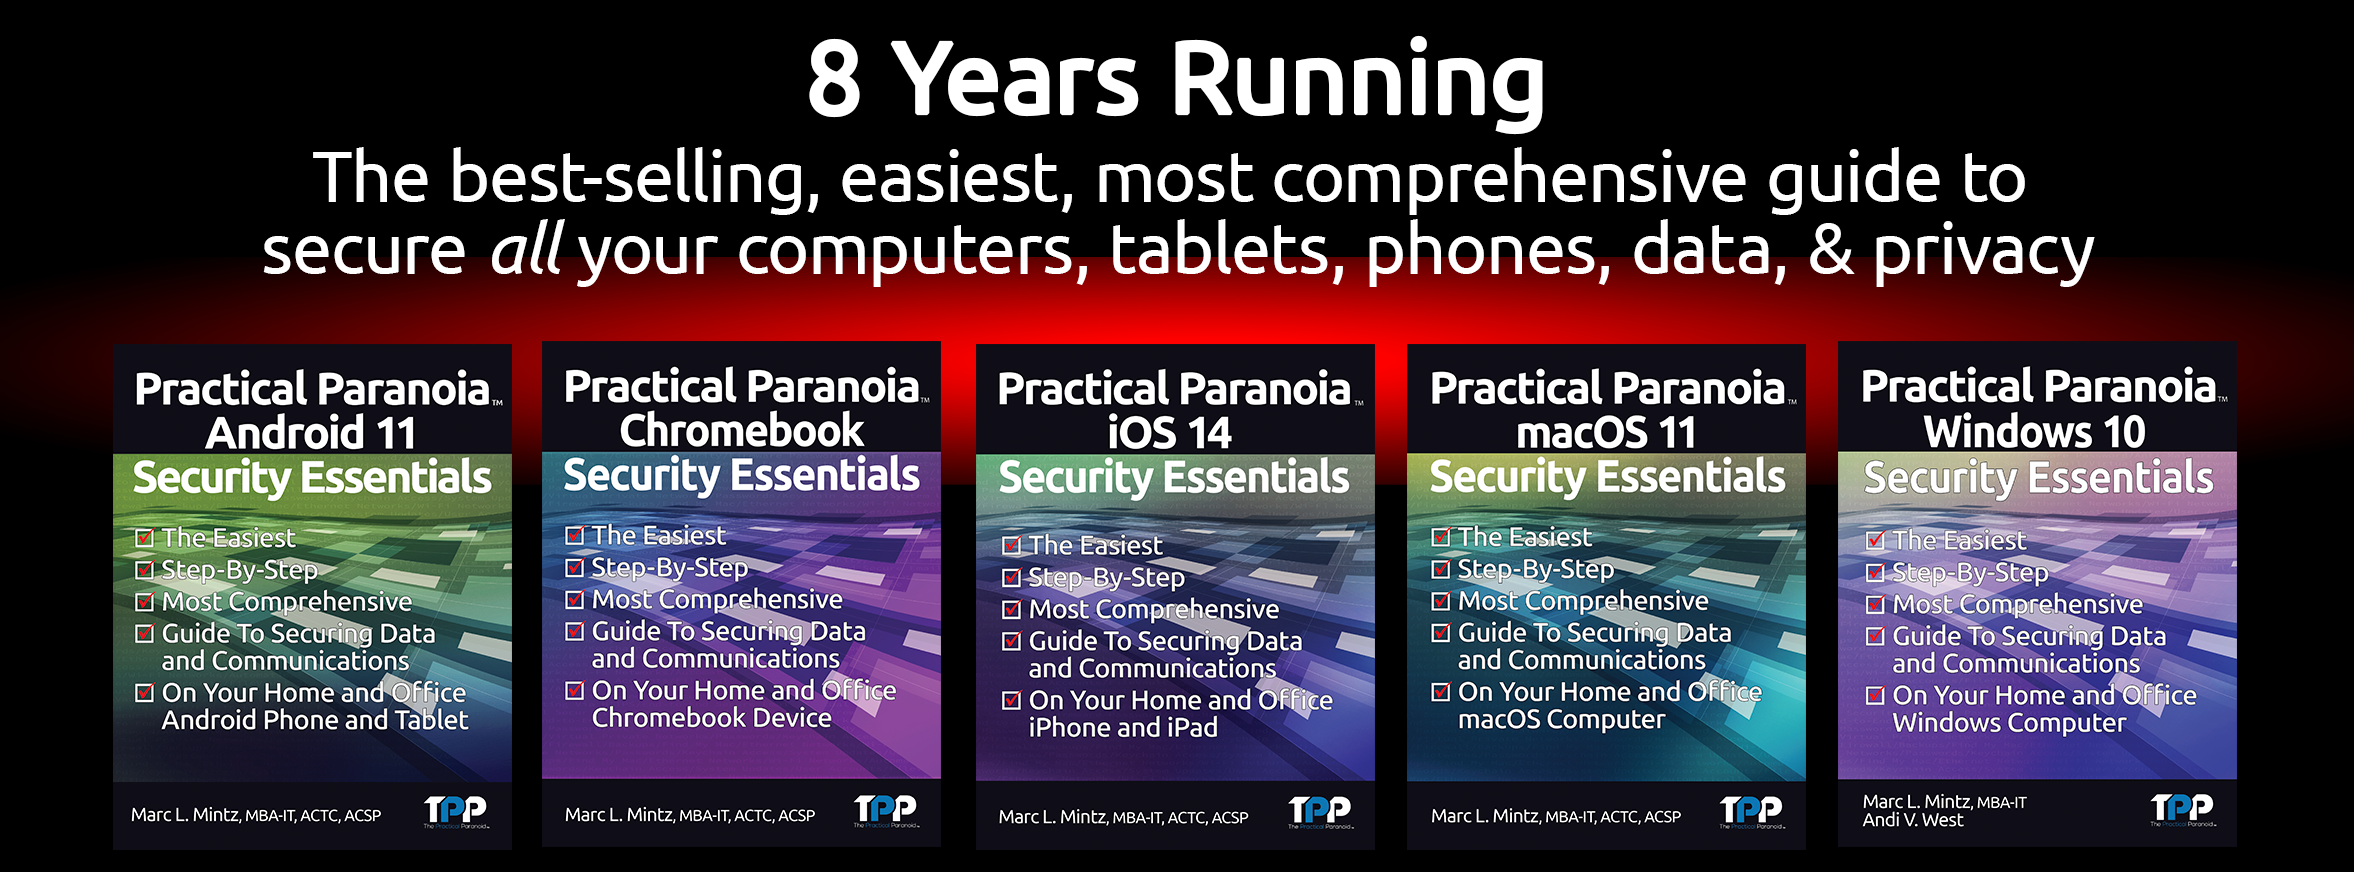
Practical Paranoia Security Essentials has been doing just that for over 8 years at the best-selling, easiest, most comprehensive guid to securing data and communications on your home and office devices.
And from now until September 30, 2022, ALL Practical Paranoia Live! Edition books are 50% off!
Visit https://thepracticalparanoid.com to order at half price today. Just enter discount code “50” at check-out.
All Practical Paranoia Security Essentials books are available in paperback, kindle, and Live! editions.
Live! editions are exact replicas of the paperback and kindle editions, made available through Google Drive. This is the version used by Universities, trade schools, and high schools, and is now available to everyone. Its advantages include: Always available on any device with a browser and internet connection, and automatically and constantly updated as the OS, applications, and best practices evolve.
Questions, call +1.505.453.0479
![]()

by Marc Mintz | Jun 21, 2021
I just love it when with just a few mouse taps I can add a solid layer of security to all the devices under my roof. It’s just icing on the cake when it’s free!
The Problem
All of the internet-connected devices under your roof need to communicate over the internet in order to function. This includes computers, tablets, smartphones, webcams, smartwatches, smart doorbells, smart thermostats, printers, and more.
With your computers, tablets, and smartphones, you can add a layer of protection against malware by installing quality antimalware software. But what about your printer, smartwatch, doorbell, thermostat… you get the picture. Each of these smart devices are open to a breach, and few offer any option to install or configure security.
The other possible problem is adult content. Should you be a parent that would prefer little Jane and Johnny to not have access to adult content, it can be a full-time job playing content cop.
The Solution
All of your home and business devices must connect to the internet through your router. Inside of each router is a setting specifying which Domain Name Server (DNS) the router will use to learn where to direct this internet traffic. If a DNS server was knowledgeable about which web addresses held malware or adult content, the DNS could pass this info along to the router, blocking access to these sites.
Lucky you! There are DNS servers with this knowledge, and Cloudflare offers them at no charge.
The How To
If you would like to block known malicious and adult content sites from all of your home and business devices, you just have to change your router DNS settings. By default, most routers use your internet provider’s DNS servers. You will change this IP address to those of Cloudflare.
CenturyLink Modem
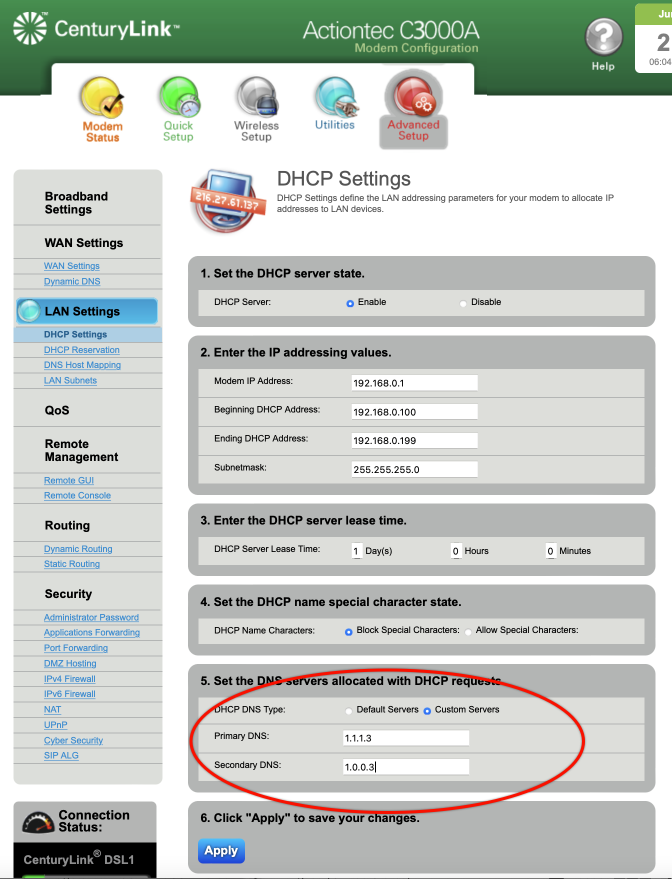
Every router has a unique interface. In the example below I’m using a CenturyLink Actiontec C3000A.
- Log in to the modem. If you aren’t familiar with the process, call your internet provider for instructions.
- From the menu bar, select Advanced Setup.
- From the sidebar, select DHCP Settings.
- In the main area of the page, scroll down to 5. Set the DNS servers allocated with DHCP requests.
- From this area, select Custom Servers.
- For malware only protection, set the Primary DNS to 1.1.1.2, and Secondary DNS to 1.0.0.2. For malware and adult content protection, set the Primary DNS to 1.1.1.3, and Secondary DNS to 1.0.0.3
- Tap the Apply button.
- Your modem may reboot. The protection will be in place immediately.
It’s Your Data… Protect It
Most people ignore their cybersecurity and internet privacy because they think it is too difficult or expensive. But what if it was fast, easy, and (almost) free? Our guides have been written by certified experts, with step-by-step illustrated instructions so that even a child can harden your security like a pro.
Visit https://thepracticalparanoid.com for the easiest, most comprehensive cybersecurity and internet privacy guides you can buy. Guaranteed!
by Marc Mintz | Jun 6, 2021
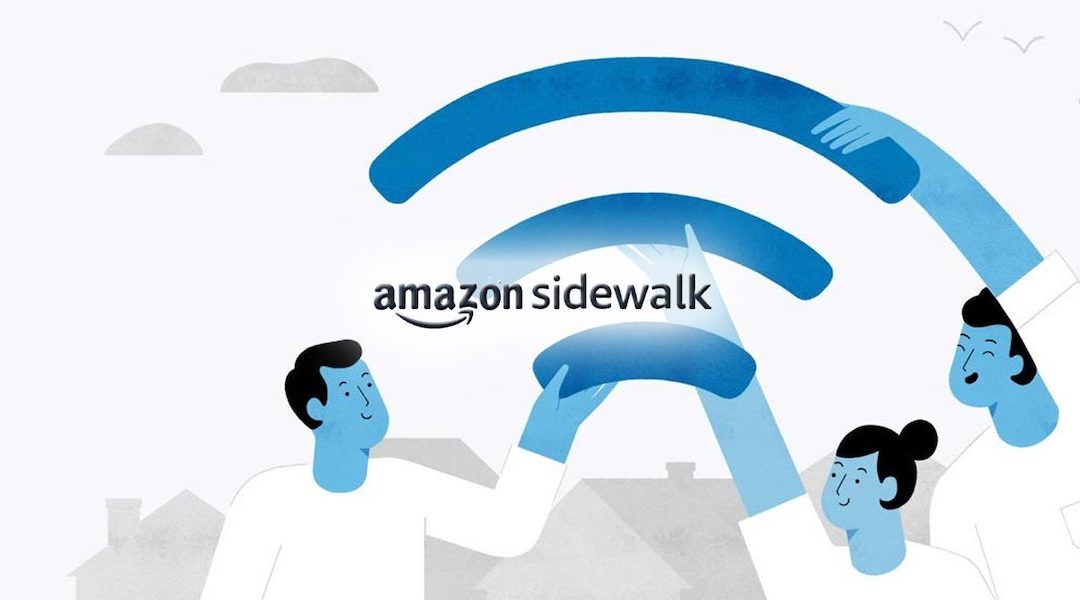
Amazon Set to Share Your Internet With Neighbors – How to Opt-Out
Come this Tuesday, June 8, 2021, Amazon will launch the Amazon Sidewalk service. This service for Echo and Ring devices automatically opts-in to share your internet bandwidth with other Amazon devices in the neighborhood.
At first glance, this service is a great idea. Share a small slice of your internet bandwidth – 80Kb/s and a 500Mb monthly cap – with other Echo and Ring devices that have lost connection with their home wi-fi. For example, if your next door neighbors’ Ring doorbell loses connection with the home wi-fi, the Ring doorbell will automatically connect with the neighbor’s home wi-fi for uninterrupted service. Or if a dog wearing a Tile escapes from their yard, as long as the dog is within range of a network using Amazon Sidewalk, the Tile will accurately report the location of the dog.
Add on to this service that it is free to Echo and Ring customers (well, at least initially), and it is a great deal.
However, there are only a few big-tech companies that have proven to handle internet privacy responsibly, and Amazon is not one of them.
The Amazon Sidewalk white paper states that any sensitive data transmitted through Sidewalk is encrypted and that Amazon does not have a way to decrypt the packets. If that is true, they need to start hiring better engineers. Even if it is true, very serious hacks of secure systems is a daily news item.
Perhaps my biggest gripe is that the system is set to automatically opt-in. I’ll take this as tacit acknowledgement by Amazon the many/most of it’s customers would choose to opt-out instead.
What You Can Do – Opt-Out
If you have an eligible Echo or Ring device and do nothing, you are automatically part of the Amazon Sidewalk system.
If you prefer to not be a part of the Amazon Sidewalk system, follow these steps:
For Amazon Echo Device Owners
- Open your Amazon Alexa App.
- Select the More option in the bottom right corner of your screen.
- Select Settings > Account Settings > Amazon Sidewalk.
- Toggle the Amazon Sidewalk to Disabled.
- Close the Amazon Alexa app.
For Amazon Ring Device Owners
- Open your Ring app.
- Select the 3-line icon to open the menu, then go to Control Center > Amazon Sidewalk.
- Toggle the Amazon Sidewalk to Disabled.
- Close the Ring app.
by Marc Mintz | Jun 5, 2021
Hiding in Plain Sight: Office 365 Email Encryption and Prevent Forwarding
Although over 1,200,000,000 people use Office 365, very few have discovered the pair of hidden gems. Well, not really hidden, just that very few people ever discover them!
The gems? Built-in email encryption and built-in block of forwarding.
That’s right, instead of spending time researching for an email encryption program, then figuring out how it works, if you have an Office 365 account with Outlook.com, you have both these features available with just a tap or two.
Send an Encrypted Email from Outlook.com
These gems are only available if you have an Office 365 account and use Outlook.com to send your mail with that account. It won’t work with your Outlook application, nor will it work with other email accounts (such as Gmail) that are linked to your Outlook account.
With those prerequisites out of the way, here is the answer you have been waiting for:
- Open a browser to https://outlook.com, then log in with your account.
- Create an email. Address the recipient to one of your other email addresses, or if performing this in class, to one of your study partners.
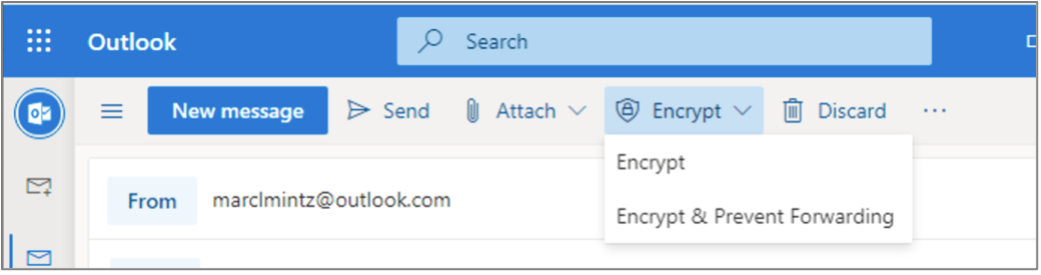
- From the toolbar, tap the Encrypt button > Encrypt, or Encrypt & Prevent Forwarding.
- Send the email.
Encrypt
When creating an outgoing email with Outlook.com, the user has the option to Encrypt the outgoing email.
On the recipient’s end, any attachments may be downloaded if using Outlook.com, Outlook application for Windows 10, the Outlook mobile app, or the Mail app in Windows 10. If using a different email client, a temporary passcode can be used to download the attachments from the 365 Message Encryption portal. The email itself remains encrypted on Microsoft servers and cannot be downloaded.
Encrypt & Prevent Forwarding
As with Encrypt option, when selecting Encrypt & Prevent Forwarding, the email remains encrypted on Microsoft servers and cannot be downloaded, copied, or forwarded. MS Office file attachments (Excel, PowerPoint, Word) remain encrypted after being downloaded. If these Office files are forwarded to someone else, the other person will not be able to open the encrypted files. Non-MS Office files can be downloaded without encryption and therefore forwarded without issue.
Read an Encrypted Email from Outlook.com
If Using Outlook.com to Read the Email
- Open a browser to https://outlook.com, then log in with the account set as the recipient in the previous assignment.
- Open the encrypted email. Note that you can open, read, and reply to this encrypted email as you can with unencrypted messages.
If Using Something Other than Outlook.com to Read the Email
- Open the email software to the account set as the recipient in the previous assignment.
- Open the encrypted email.
- You will see a message with instructions for how to read the encrypted message.
by Marc Mintz | Mar 4, 2021
For years I have recommended the use of a password manager to help generate and store strong passwords. My go-to product has been LastPass. But now that LastPass has moved many of their features away from their free to their for-fee product, you may want to take a look at a competitor–Bitwarden.
I’ve been using Bitwarden for the past month on my Chromebook, iPhone, macOS 11 (Silicon), and Windows machines, and I’ve never been happier with a password manager.
If you aren’t familiar with a password manager, you are probably using one without even realizing it! Most browsers now have built-in password managers. So after you have been to a site once, your browser remembers your login credentials. On your subsequent visits, the browser will autofill these credentials so that you don’t have to remember them.
This browser-based password manager works well, but it can be much better. What Bitwarden brings to the table above and beyond the browser-based password managers includes:
- Free and for-fee accounts, family accounts, and business accounts
- Synchronize passwords across all devices
- Synchronize passwords across Android, Chrome OS, iOS, iPadOS, macOS, and Windows devices
- Strong password generator
- Secure store of notes (such as Challenge Questions), and credit card information
- Share passwords (for-fee accounts)
- 2-Factor Authenticator (One-Time-Password Generator) (for-fee accounts)
It’s this 2-Factor Authenticator that really won me over. 2FA is currently the only method to effectively keep hackers out of your accounts. Every password can be cracked. But if you have 2FA enabled on an account, even if the bad agents know your username and password, they have no access to your account.
The problem with 2FA is that should your 2FA device (typically a smartphone) become damaged or lost, YOU will have a rough time gaining access to your own accounts.
Bitwarden solves this issue by sharing 2FA with your various devices that also have Bitwarden installed. It even automatically backs up your 2FA coding to the cloud (strongly encrypted, of course), so that it is easily accessible in case of loss.
Be forewarned, Bitwarden 2FA is not available on the free version. It will cost you $10/year to upgrade to their premium service.
Enough rambling. Time to upgrade your security and get Bitwarden running on your systems.
Install and Configure Bitwarden
To conserve space, my instructions will be based on macOS, but the process is almost identical on all platforms.
Although it looks like a lot of steps, I promise this is quick and easy. And once done, will save you a ton of time, and significantly hardens your security.
Download and Install
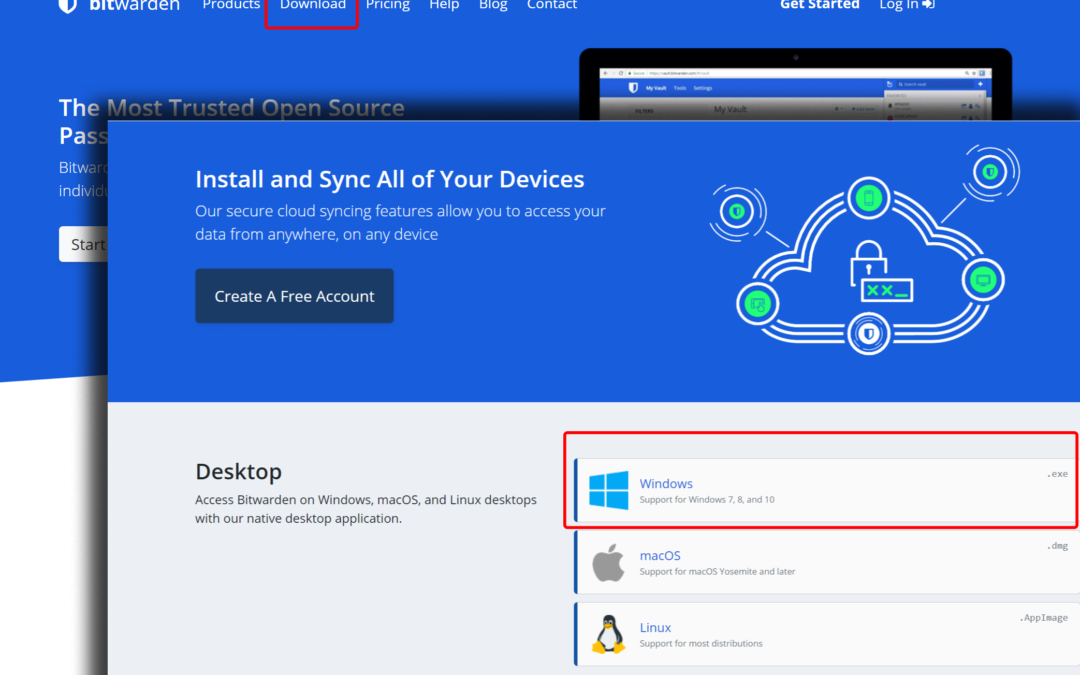
- Open a browser to https://bitwarden.com.
- Select Download.
- Select Create A Free Account. Follow the onscreen instructions to create your account. I recommend upgrading to Premium now so that you have immediate access to 2FA, but you can just go with the free account to test the waters.
- Return to the Download page, and then select your OS–Linux, macOS, or Windows.
- Download and install the app.
- Launch the app, and register with the account you created.
Configure
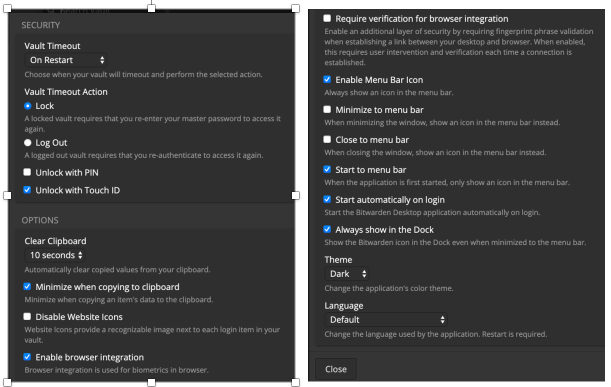
- Open Bitwarden Preferences. Configure to your taste. My recommendation is shown below. When complete, click Close.
Enable Two-Step Login
As the keys to your treasure are stored in this database, not only is a strong Bitwarden password important, but so is having Two-Step Login enabled.
- Open a browser to https://bitwarden.com.
- Log in.
- Select Settings > Two-Step Login.
- Select your preferred method to get a verification code. In this example, I’m using Email.
- At the prompt, enter your email address, and then click Sent Email.
- Open your email to find the verification email.
- Copy the verification code from the email, paste it into the Bitwarden verification field, and then select Enable.
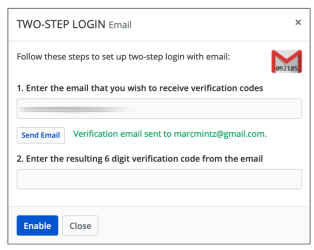
- At the confirmation dialog, select Close.
- In the Bitwarden Two-Step Login page, select View Recovery Code.
- Copy and then securely store your recovery code. This code will be vital if you lose access to your Bitwarden 2FA Authenticator. When done, select Close.
Install Browser Extensions
You are not set up with Bitwarden. The last step is to install a Bitwarden browser extension so that your database is accessible from your browser.
- Open a browser to https://bitwarden.com > Download.
- Select your desired browser. The extension will download to your system.
- Open the downloaded extension to install it in your browser.
- In your browser, select the extension icon in the toolbar > select Enable.
- At the prompt, enter your Bitwarden credentials to enable the extension.
Configure Browser Extension
- Select the browser extension to open it.
- Select Sync > Sync Vault Now to synchronize any stored data.
- Configure Vault Timeout to On Browser Restart, and Vault Timeout Action to Lock.
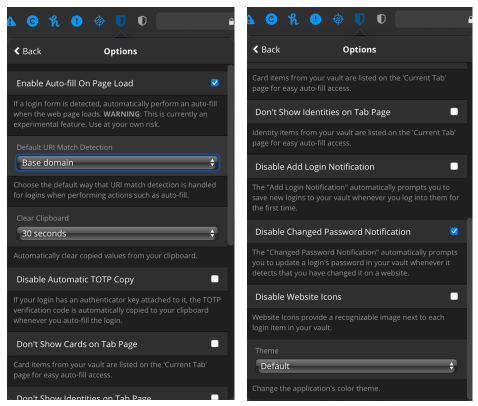
- Scroll down to select Options. Configure to your taste. When done, click outside of the Bitwarden window to close. My recommendation is shown below:
Adding Credentials to Bitwarden
You are now set and ready to go. You can manually enter credentials from the browser extension or the app. You can also visit a site, enter your credentials, and then reply Yes when Bitwarden prompts if you want to store the password (you could almost miss the prompt – it will be at the top of the window).
Configure Bitwarden Two-Step Authentication
2FA is absolutely vital to help ensure the security of your accounts. If a site offers 2FA (sometimes called Multi-Factor Authentication and 2-Step Verification), go for it.
Once 2FA is active on a site, you will need to provide a code provided by the 2FA source (in this case, Bitwarden) the first time you login to a new device or new browser. Some sites are configured to prompt for 2FA on every visit, once a week, or once a year. Let’s walk through getting your first 2FA configured in Bitwarden.
- Open a browser to your target site. In my example that will be Google. Their security page is https://security.google.com.
- In the main body area, scroll down to select 2-Step Verification.
- At the prompt, enter your Google credentials, and then select Next.
- Scroll down to the Authenticator app section, and then select SET UP.
- At the Get codes from the Authenticator app, select the type of smartphone you use (Android or iPhone), and then select Next.
- In the Set up Authenticator window, it is designed to be captured with a smartphone camera. As we are using a computer, select CAN’T SCAN IT?
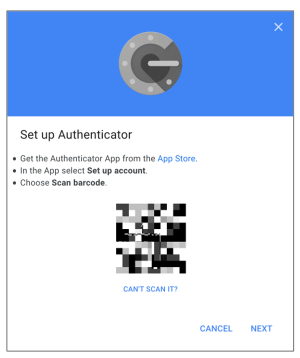
- In the Can’t scan the barcode? dialog, select and then copy the 32-character code.
- Open Bitwarden, select your Google account, and then select the Edit (pencil) icon.
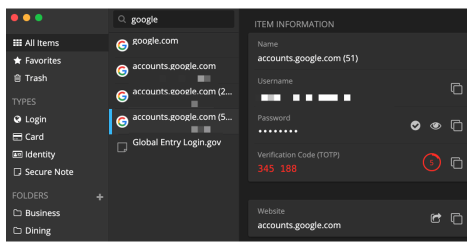
- Paste the code copied in step 7 into the Authenticator Key (TOTP) field, and then click the Save (disk) icon.
- In the ITEM INFORMATION area of your Bitwarden Google record, you will now see a Verification Code (TOTP) field. This is the one-time only authenticator code that can be used when prompted by Google. If you have other devices with Bitwarden, they will now also have this new field.

by Marc Mintz | Dec 4, 2018
The Problem
As reported in the December 4, 2018 SpreadPrivacy.com article, when performing internet searches using Google, the results were personalized for the user even when logged out of the user’s Google account, and when in Incognito Mode.
The bottom line is that Google is using identifiers other than Google account login to identify users when searching. This can be easily done using the digital fingerprint of the device.
To be fair, Google will tell you that personalizing search results is a feature of using Google search. That based on each users search and browsing history, Google will filter and prioritize search results to best meet the world view and preferences of the user. For example, if you browse politically conservative websites, when performing searches of a political nature, you are likely to see links to articles more favorable to the conservative perspective than would someone who browses liberal websites.
Up until now, it was assumed such search filters were in effect only when logged in to ones Google account. But that is now known to be incorrect.
The Solution
If, as Google believes to be true, you prefer having your internet searches filtered so they better align with your world view, then you need do nothing!
However, if you would prefer to have a more accurate view of the world through internet searches, there are a few steps to take:
- Stop using Chrome as your web browser. Replace it with Firefox, Brave, or Safari. These three browsers do not monitor or record your browsing history.
- Replace your default search engine with DuckDuckGo (DDG). DDG doesn’t monitor or record your search or browser history. It submits your search request to dozens of search engines, takes the results, eliminates duplicates, and presents an accurate search result.
- Firefox: Visit https://duckduckgo.com, and then follow the on-screen instructions.
- Safari: In Safari Preferences, set the default search engine to DuckDuckGo.
- Brave: In Brave Settings, set the default search engine to DuckDuckGo.
- Replace your default DNS provider. DNS is what translates https://websitexyz.com to an IP address your computer knows how to find. Most DNS services monitor and record your internet traffic, and make it available for sale. Use a DNS provider that does not do this. There two most popular are Cloudflare (1.1.1.1, 1.0.0.1) and OpenDNS.
- Cloudflare: Cloudflare may be the world’s fastest DNS service. Until recently it had been our go-to solution. I still consider it excellent. However (gotta hate those “howevers” in live), it appears to be going through some growing pains at the moment, resulting in occasional failed service). Go to your Network Settings, delete the current entry for DNS, and replace with 1.1.1.1 and 1.0.0.1.
- OpenDNS: OpenDNS is the great granddaddy of anonymized DNS services. In addition to their free service, their for-fee services allow filtering of content. Go to https://www.opendns.com, sign up for a free account, and then go to your Network Settings, delete the current entry for DNS, and replace with 208.67.222.222 and 208.67.220.220.
- Block Web Trackers. Most commercial websites use web trackers. These monitor all of your activity on the site. This information may be used exclusively by the website, but is more likely to be sold to advertisers (including Google). It is best to block web trackers. My preferences is to use the Ghostery browser extension.
- Brave, Firefox, and Safari: Open your browser to https://www.ghostery.com. Follow the on-screen instructions to download and install the Ghostery extension. Once installed, select the Ghostery icon to configure settings.
- Obfuscate Digital Fingerprint. By continuously changing your digital fingerprint, or by forcing your digital fingerprint to look generic, it becomes difficult or impossible for websites and web trackers to know who you are or to follow your browsing history.
- Safari: Safari (macOS 10.14) automatically generates a generic digital fingerprint. Nothing you need to do.
- Brave and Firefox: You’ve already solved the problem by completing step 4 above. Ghostery also continously modifies your digital fingerprint.
Next steps
These are just the tip of the iceberg for online privacy. Want to fully secure your computer, data, and identity? The Practical Paranoia Security Essentials books have been the #1 best-selling and easiest to follow DIY cybersecurity series for over 5 years! Available now at 50% discount for our online Live! edition.
by Marc Mintz | Oct 23, 2018
Apple has just released macOS 10.14 Mojave–the most advanced computer operating system ever. It is recommended that all Macintosh users upgrade to take advantage of all the new features, including:
- Stacks automatically organize files on your Desktop
- Finder is more powerful than ever–locate a file by how it looks, instantly see all file metadata, and perform Quick Actions on files without opening the app
- Photos–shoot an image with your iPhone and have it automatically appear on your Mac in Finder, Mail, Messages, Notes, Pages, Keynote, and Numbers
- Facetime allows for group audio and video calls with up to 32 people
- Security–apps are required for your explicit approval before accessing the camera, microphone, and data in Messages and Mail
- Security–a more secure Safari, which prevents website Share buttons and comment widgets from tracking you, as well as blocking advertisers from targeting you based on device fingerprint (this is HUGE)
- Security–automaticly generate and store strong passwords
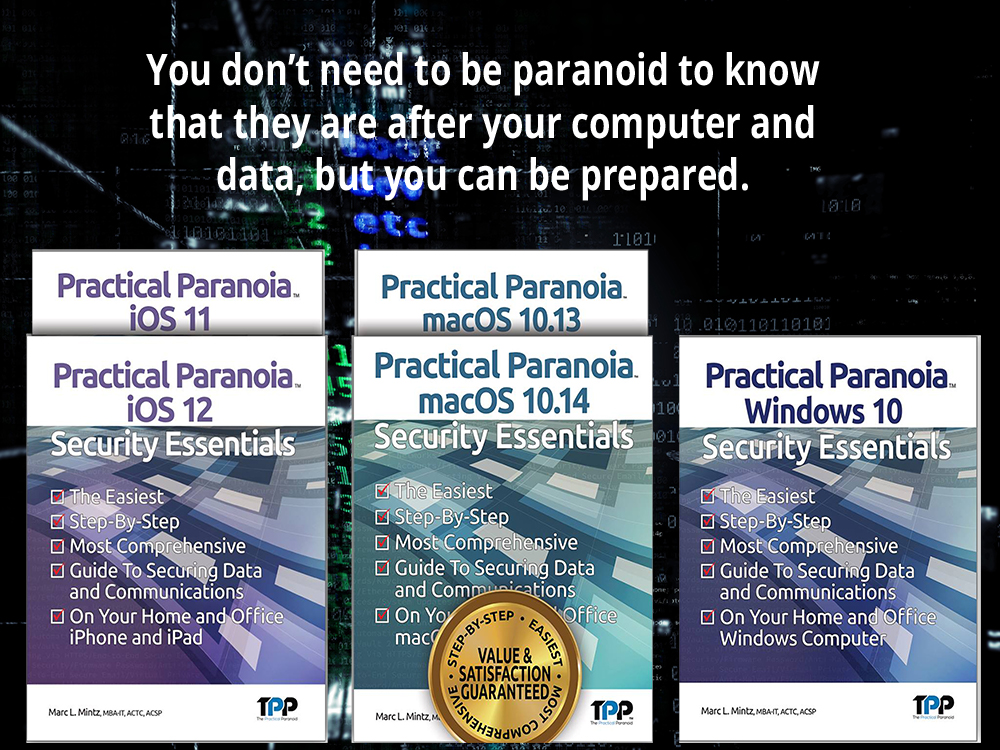
Right alongside the release of macOS 10.14 is a brand new Practical Paranoia macOS 14 Security Essentials. The best-selling, easiest, step-by-step, most comprehensive guide to securing your home or business macOS computers.
Official workbook for the Practical Paranoia: Security Essentials Workshop, STEM and college cybersecurity courses. Designed for instructor-led and self-study. The entire course is contained within the book. Includes all instructor presentations, hands-on assignments, links to all software, and security checklist.
You don’t need to be paranoid to know they are out there to get your computer, data, and identity.
- 2,000,000 laptops were stolen or lost in the US last year.
- Only 3% of stolen computers are ever recovered.
- Malware attacks on macOS have become commonplace.
- Hundreds of eyes may be able to see your name and password, along with the contents of every email you send.
- Once the bad guy has his hands on your Mac, it takes under one minute to bypass your password to gain access to all your data.
- With a slight bit of social engineering, your iCloud, Facebook, LinkedIn, Google, and other social media accounts, along with all your data, is freely accessible.
- Through PRISM and other avenues, our government has access to your online browsing and email history.
You don’t need to be an Apple Genius to protect your system!
In this easy, step-by-step guide, CIO, Security Specialist, and Certified Apple Consultant Marc L. Mintz takes any macOS user–from the novice with no technical skills, to experienced IT professional–through the process of fully encrypting and hardening the security of their computer, data, email, documents, network, instant messaging, storage devices, iCloud, browsing, and entire Internet experience.
It’s your information. Protect it.
Guaranteed to be the easiest to follow and most comprehensive macOS cybersecurity book available.
Practical Paranoia macOS 10.14 Security Essentials Live!
is available this week at a 50% discount!
Visit https://thepracticalparanoid.com to place your order now.
Sample Views

by Marc Mintz | Oct 23, 2018
Apple released iOS 12 this month–the most advanced mobile operating system ever. It is recommended that all iPhone and iPad users upgrade to take advantage of all the new features, including:
- 50-200% performance improvement
- FaceTime now supports video and audio with up to 32 people at once
- Personal Animoji
- The most advanced Augmented Reality
- Do Not Disturb can now be set for just a meeting or location-based
- A more secure Safari, which prevents website Share buttons and comment widgets from tracking you, as well as blocking advertisers from targeting you based on device fingerprint (this is HUGE)
Right alongside the release of iOS 12 is a brand new Practical Paranoia iOS 12 Security Essentials. Completely revised for the new iOS, this book contains everything you need to fully secure your device, data, web browsing, and communications on your iPhone and iPad. Written for the non-technical user, it uses illustrated step-by-step guides to meet the highest security standards.
It’s your information. Protect it.
by Marc Mintz | Oct 7, 2018
Apple has just released iOS 12 for iPhone and iPad–the most advanced mobile operating system ever. It is recommended that all iPhone and iPad users upgrade to take advantage of all the new features, including:
- Speed–Up to 200% faster
- FaceTime–Video and audio sharing with up to 32 people at once
- Notifications–Instant Tuning reduces interruptions
- Photos–Faster, easier, intelligent sharing
- Siri–Create custom shortcuts
- Security–a more secure Safari, which prevents website Share buttons and comment widgets from tracking you, as well as blocking advertisers from targeting you based on device fingerprint (this is HUGE)
- Security–automaticly generate and store strong passwords
Right alongside the release of iOS 12 is a brand new Practical Paranoia iOS 12 Security Essentials. The best-selling, easiest, step-by-step, most comprehensive guide to securing your home or business iPhones and iPads.
Official workbook for the Practical Paranoia: Security Essentials Workshop, STEM and college cybersecurity courses. Designed for instructor-led and self-study. The entire course is contained within the book. Includes all instructor presentations, hands-on assignments, links to all software, and security checklist.
You don’t need to be paranoid to know they are out there to get your computer, data, and identity.
- 3,000,000 phones were stolen or lost in the US last year.
- Malicious attacks have started on iOS.
- Hundreds of eyes may be able to see your name and password, along with the contents of every email you send.
- Once the bad guy has his hands on your iPhone or iPad, it takes under one minute to bypass your password to gain access to all your data.
- With a slight bit of social engineering, your iCloud, Facebook, LinkedIn, Google, and other social media accounts, along with all your data, is freely accessible.
- Through PRISM and other avenues, our government has access to your online browsing and email history.
You don’t need to be an Apple Genius to protect your system!
In this easy, step-by-step guide, CIO, Security Specialist, and Certified Apple Consultant Marc L. Mintz takes any iOS user–from the novice with no technical skills, to experienced IT professional–through the process of fully encrypting and hardening the security of their device, data, email, documents, network, instant messaging, iCloud, browsing, and entire Internet experience.
It’s your information. Protect it.
Guaranteed to be the easiest to follow and most comprehensive macOS cybersecurity book available.

by Marc Mintz | Aug 19, 2018
A: You, personally, do not have either the tools or the legal footing to do so. That said, law enforcement does have the tools (at least the tools to get your ISP to assist with linking IP address with individual computers). It is still required to get the legal footing to start such a project.
It is doubtful you will get the assistance of law enforcement for something as “trivial” (I know, it’s not trivial to you) as someone attempting to access your home security, but it can’t hurt approach them.
Ultimately, it will require coordination with law enforcement, your ISP, and the ISP of the attacker to isolate who this may be.
Perhaps a better plan of action is to ensure all possible security protocols are in place for your home security system, thereby greatly reducing the possibility of penetration. Not knowing your security system, at a minimum, this would include:
- Use of strong password to access the security system (at least 15 characters, preferably more)
- Firmware and software up to date
- Your modem and router firewall configured properly

by Marc Mintz | Aug 19, 2018
A: There is very little reason you should trust a VPN provider with your internet privacy. The vast majority of VPN providers are operating on the other side of ethics, or are outright criminal organizations.
On the other hand, why should you trust anyone (priests come to mind, as do politicians, police, used car dealers, your wackadoodle ex, etc.)?
But you can do your due diligence. Research reviews, BBB records, how long they have been in business, etc. My current VPN favorite is NordVPN.com.
by Marc Mintz | Aug 18, 2018
A new attack vector named VORACLE can recover HTTP traffic that is sent via encrypted VPN connections under certain conditions. The conditions appear to be:
- Use the OpenVPN protocol
- Visit an HTTP that is under control or compromised by the attacker
- Using OpenVPN compression. OpenVPN can optionally use or not use compression. By default, it uses compression. This is usually under the control of the VPN provider.
Our recommendation is to not use OpenVPN. Instead, use the IKEv2 encryption protocol. If your VPN provider does not support IKEv2, change providers. My current favorite is NordVPN.
More information can be found on Bleeping Computer.

by Marc Mintz | Aug 13, 2018
As reported in an AP Exclusive, Google wants to monetize your data so badly, that for Android devices and iPhone users of Google Maps, Google Chrome, Google Search, and possibly other apps, even when Location Tracking is turned off, Google is still capturing your location information.
To see if Google is tracking your location, visit https://myactivity.google.com.
PREVENT TRACKING
Any Device
- Open a browser and then log in to your Google account.
- Go to https://myactivity.google.com.
- From the sidebar, select Activity Controls
- Disable Web & App Activity.
- Disable Location History.
- Note: Doing this will pretty much disable Google Assistant and Google Home Smart Speaker.
iOS
Set Google Maps to Inactive when not in use:
- Open Settings > Google Maps > Location
- Set to While Using. This will limit the app from accessing your location when it is not active.
Set Search Engine to DuckDuckGo
- Open Settings > Safari > Search Engine.
- Set to DuckDuckGo.
Disable Location Tracking:
- Open Settings > Privacy > Location Services.
- Disable or set to While Using for all services.
Android
- Go to Main Settings icon > Security & Location.
- Scroll down to Privacy.
- Tap Location.
- Turn off for the entire device.
- Select App-Level Permissions to turn off access to various apps.
- When performing web searches, if using Chrome, first go to https://duckduckgo.com to perform the search. Better yet, use a different browser, such as Brave.com
DELETE PAST LOCATION TRACKING
Any Device
- Go to https://myactivity.google.com
- Look for any entry that has a location pin icon next to the word details.
- Click on the location pin to open a window that may include a link to Google Maps displaying your location at that time.
- Click the navigation icon with 3 stacked dots, and then click Delete.

by Marc Mintz | Aug 2, 2018
Domain Name System (DNS)
Most activities on the Internet require pointing to a specific device by use of an address. For example, to use my email, the email software must be able to locate my email server. It does this by looking for mail.mintzit.com.
While such human-readable names (called a Fully Qualified Domain Name, or FQDN) work well for you and me, not so much for computers. Computers expect to use a TCP-IP address. In the case of this server, that is 172.217.3.39.
The translation from FQDN to TCP-IP address is done by way of the Domain Name System (DNS). The process works like this:
- The user, software, or setting enters the FQDN. For this example, I may enter it in a web browser so that I may view my email.
- The browser has no idea how to find the FQDN, so it sends the request to the designated DNS
- The DNS server maintains a database of all registered FQDN and their TCP-IP address. It sends the search result back to my computer, the browser then takes me to my email.
The system works amazingly fast and is highly stable. The concern is that your Internet provider is also likely your DNS provider. This allows them to monitor and log most of your Internet activity without your consent or knowledge.
If you use VPN, and your VPN provider has DNS Leak Protection, your Internet provider cannot see your DNS queries. But you probably aren’t using VPN all of the time.
To protect your Internet activity from being logged by your Internet provider, manually configure your DNS server to be one that ensures your privacy. I recommend the 1.1.1.1 and 1.0.0.1 servers hosted by Cloudflare[1].
Assignment: Secure DNS Traffic (Windows)
In this assignment, you manually configure your DNS settings to use Cloudflare instead of the default (typically your Internet provider) DNS.
- Open Control Panel.
- Click Network and Internet.
- Click Network and Sharing Center.
- Click Change adapter settings.
- Right-click the network interface currently connected to the Internet, and then select
- Select Internet Protocol Version 4 (TCP/IPv4).
- Click the Properties
- Select Use the following DNSserver addresses.
- Enter 1.1.1 as the Preferred DNSserver.
- Enter 0.0.1 as the Alternate DNSserver.
- Click the OK
- Exit the Control Panel
From now on, all of your DNS searches will be performed securely by Cloudflare.
Assignment: Secure DNS Traffic (macOS)
In this assignment, you manually configure your DNS settings to use Cloudflare instead of the default (typically your Internet provider) DNS.
- Open Apple menu > System Preferences > Network.
- Click the lock icon, and then authenticate as an administrator.
- Click Advanced
- Click DNS.
- Click the + button. The existing DNS entries should disappear.
- Enter 1.1.1 as the first entry.
- Click the + button.
- Enter 0.0.1 as the second entry.
- Click the OK
- Click the Apply
From now on, all of your DNS searches will be performed securely by Cloudflare.
Assignment: Secure DNS Traffic (iOS)
In this assignment, you manually configure your DNS settings to use Cloudflare instead of the default (typically your Internet provider) DNS.
- Open Settings > Wi-Fi > current Wi-Fi SSID Info icon > Configure DNS.
- Select Manual.
- Delete the existing DNS entries.
- Tap Add Server.
- Enter 1.1.1 as the first entry.
- Tap Add Server.
- Enter 0.0.1 as the second entry.
- Tap Save.
- Exit Settings.
From now on, all of your DNS searches will be performed securely by Cloudflare
[1] https://www.cloudflare.com/learning/dns/what-is-1.1.1.1/