I just love it when with just a few mouse taps I can add a solid layer of security to all the devices under my roof. It’s just icing on the cake when it’s free!
The Problem
All of the internet-connected devices under your roof need to communicate over the internet in order to function. This includes computers, tablets, smartphones, webcams, smartwatches, smart doorbells, smart thermostats, printers, and more.
With your computers, tablets, and smartphones, you can add a layer of protection against malware by installing quality antimalware software. But what about your printer, smartwatch, doorbell, thermostat… you get the picture. Each of these smart devices are open to a breach, and few offer any option to install or configure security.
The other possible problem is adult content. Should you be a parent that would prefer little Jane and Johnny to not have access to adult content, it can be a full-time job playing content cop.
The Solution
All of your home and business devices must connect to the internet through your router. Inside of each router is a setting specifying which Domain Name Server (DNS) the router will use to learn where to direct this internet traffic. If a DNS server was knowledgeable about which web addresses held malware or adult content, the DNS could pass this info along to the router, blocking access to these sites.
Lucky you! There are DNS servers with this knowledge, and Cloudflare offers them at no charge.
The How To
If you would like to block known malicious and adult content sites from all of your home and business devices, you just have to change your router DNS settings. By default, most routers use your internet provider’s DNS servers. You will change this IP address to those of Cloudflare.
CenturyLink Modem
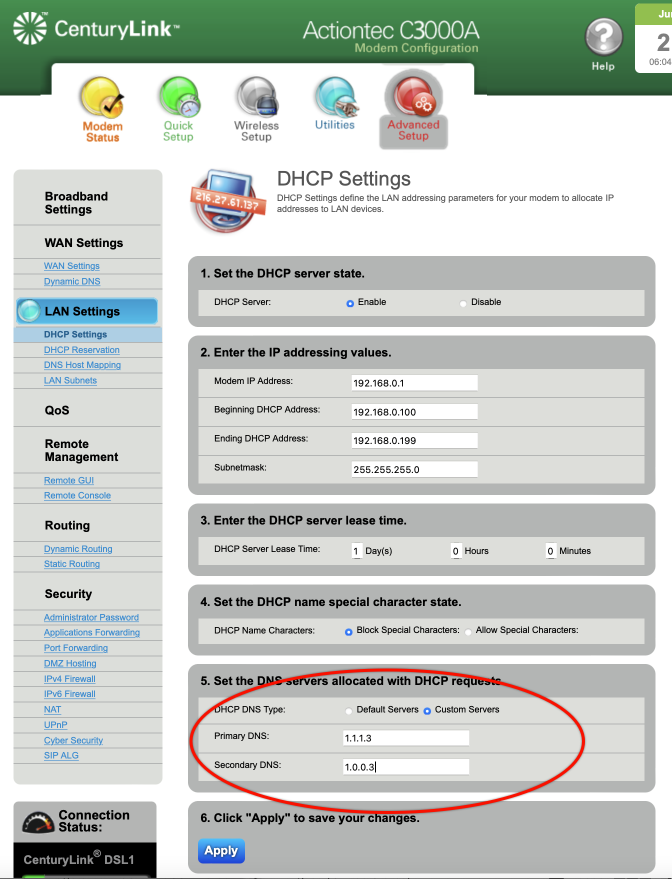
Every router has a unique interface. In the example below I’m using a CenturyLink Actiontec C3000A.
- Log in to the modem. If you aren’t familiar with the process, call your internet provider for instructions.
- From the menu bar, select Advanced Setup.
- From the sidebar, select DHCP Settings.
- In the main area of the page, scroll down to 5. Set the DNS servers allocated with DHCP requests.
- From this area, select Custom Servers.
- For malware only protection, set the Primary DNS to 1.1.1.2, and Secondary DNS to 1.0.0.2. For malware and adult content protection, set the Primary DNS to 1.1.1.3, and Secondary DNS to 1.0.0.3
- Tap the Apply button.
- Your modem may reboot. The protection will be in place immediately.
It’s Your Data… Protect It
Most people ignore their cybersecurity and internet privacy because they think it is too difficult or expensive. But what if it was fast, easy, and (almost) free? Our guides have been written by certified experts, with step-by-step illustrated instructions so that even a child can harden your security like a pro.
Visit https://thepracticalparanoid.com for the easiest, most comprehensive cybersecurity and internet privacy guides you can buy. Guaranteed!