pixel
Should You Update Router and Modem Firmware?

Should You Update Router and Modem Firmware?

Why

Many of us know how vital it is to ensure our computers, phones, and software are updated on a regular basis. But very few give the same thought to our routers and modems.

But perhaps I’ve gotten ahead of myself. The big question is “What is all the fuss about updates? After all, I’ve got the features I need”.

There are three reasons developers release updates:

  • Monitization. At some point the developer often charges for updates. This is a reality of being in the type of economy we in most developed states.
  • Bug fixes and new features. There are always bugs and features to be added.
  • Security fixes. Ok, this technically falls under “Bug fixes”, but it is important enough to have its own bullet point. Bullet points are cheap!

Security fixes are my focus for updates.

Security fixes typically result from a breach. Once it has been discovered and the appropriate developer notified, they eventually get around to fixing it. There will always be someone who is the first to be hacked by a vulnerability. But you can certainly avoid being a future victim by installing the security fix.

Back to routers and modems.

The majority of users never check their network equipment for software or firmware updates. It is common for me to see a five year old router that not only has never been updated, but the default administrator, admin password, and wifi password are all still at defaults.

This is understandable. Unlike your computer or phone, updating network equipment is not a one-click operation, and it involves dealing with a device that is alien to all but IT professionals.

But like most everything else in life, it’s easy when you know how.

How

The easiest option is if your network device is leased or was purchased from your ISP–like Xfiniti, Qwest, AT&T, etc. In that case, just give customer support a call and ask them to ensure the device is updated. They can do this remotely, often in under five minutes.

If your device doesn’t fall under this condition, it is still easy. As every device is different, let me outline the process instead of giving device-specific detailed step-by-step instructions:

  1. As updating a network device will break a network connection temporarily, ensure that nobody and no device is actively working on either the Internet or local network.
  2. Pull out or download the manual for the device. What you are looking for is the default administrator username and password. If you have changed these, you should already have the. credentials at hand.
  3. Figure out the IP address of the device. Most network devices have an IP address of 192.168.0.1 or 192.168.1.1. You can find your device address by opening up your network settings or preferences on any device connected to your network. The specific field within the network settings may be called “router” or “gateway”.
  4. Most network devices can be accessed using a web browser. Open a browser, then instead of entering a website name into the URL or address bar, enter the router IP address, then tap the. Enter or Return key.
  5. The network device will present an authentication window. Enter the administrator username and password, then tap the Enter button.
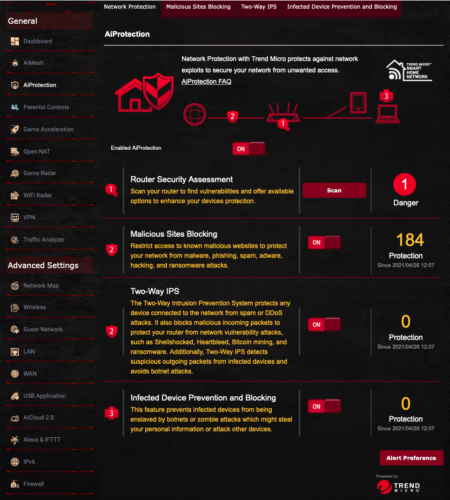
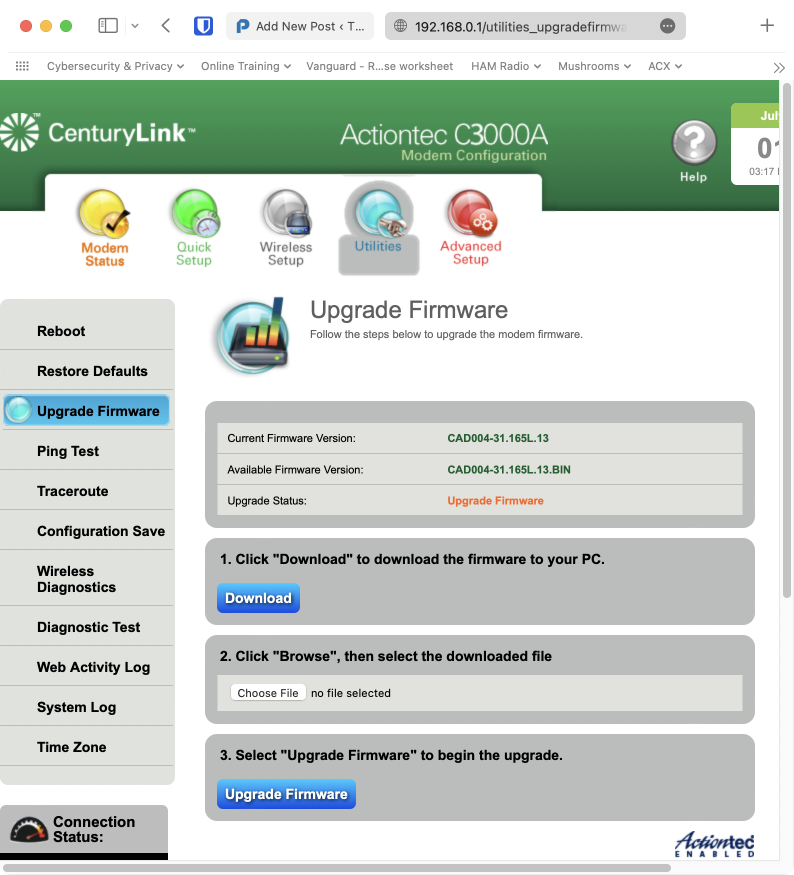
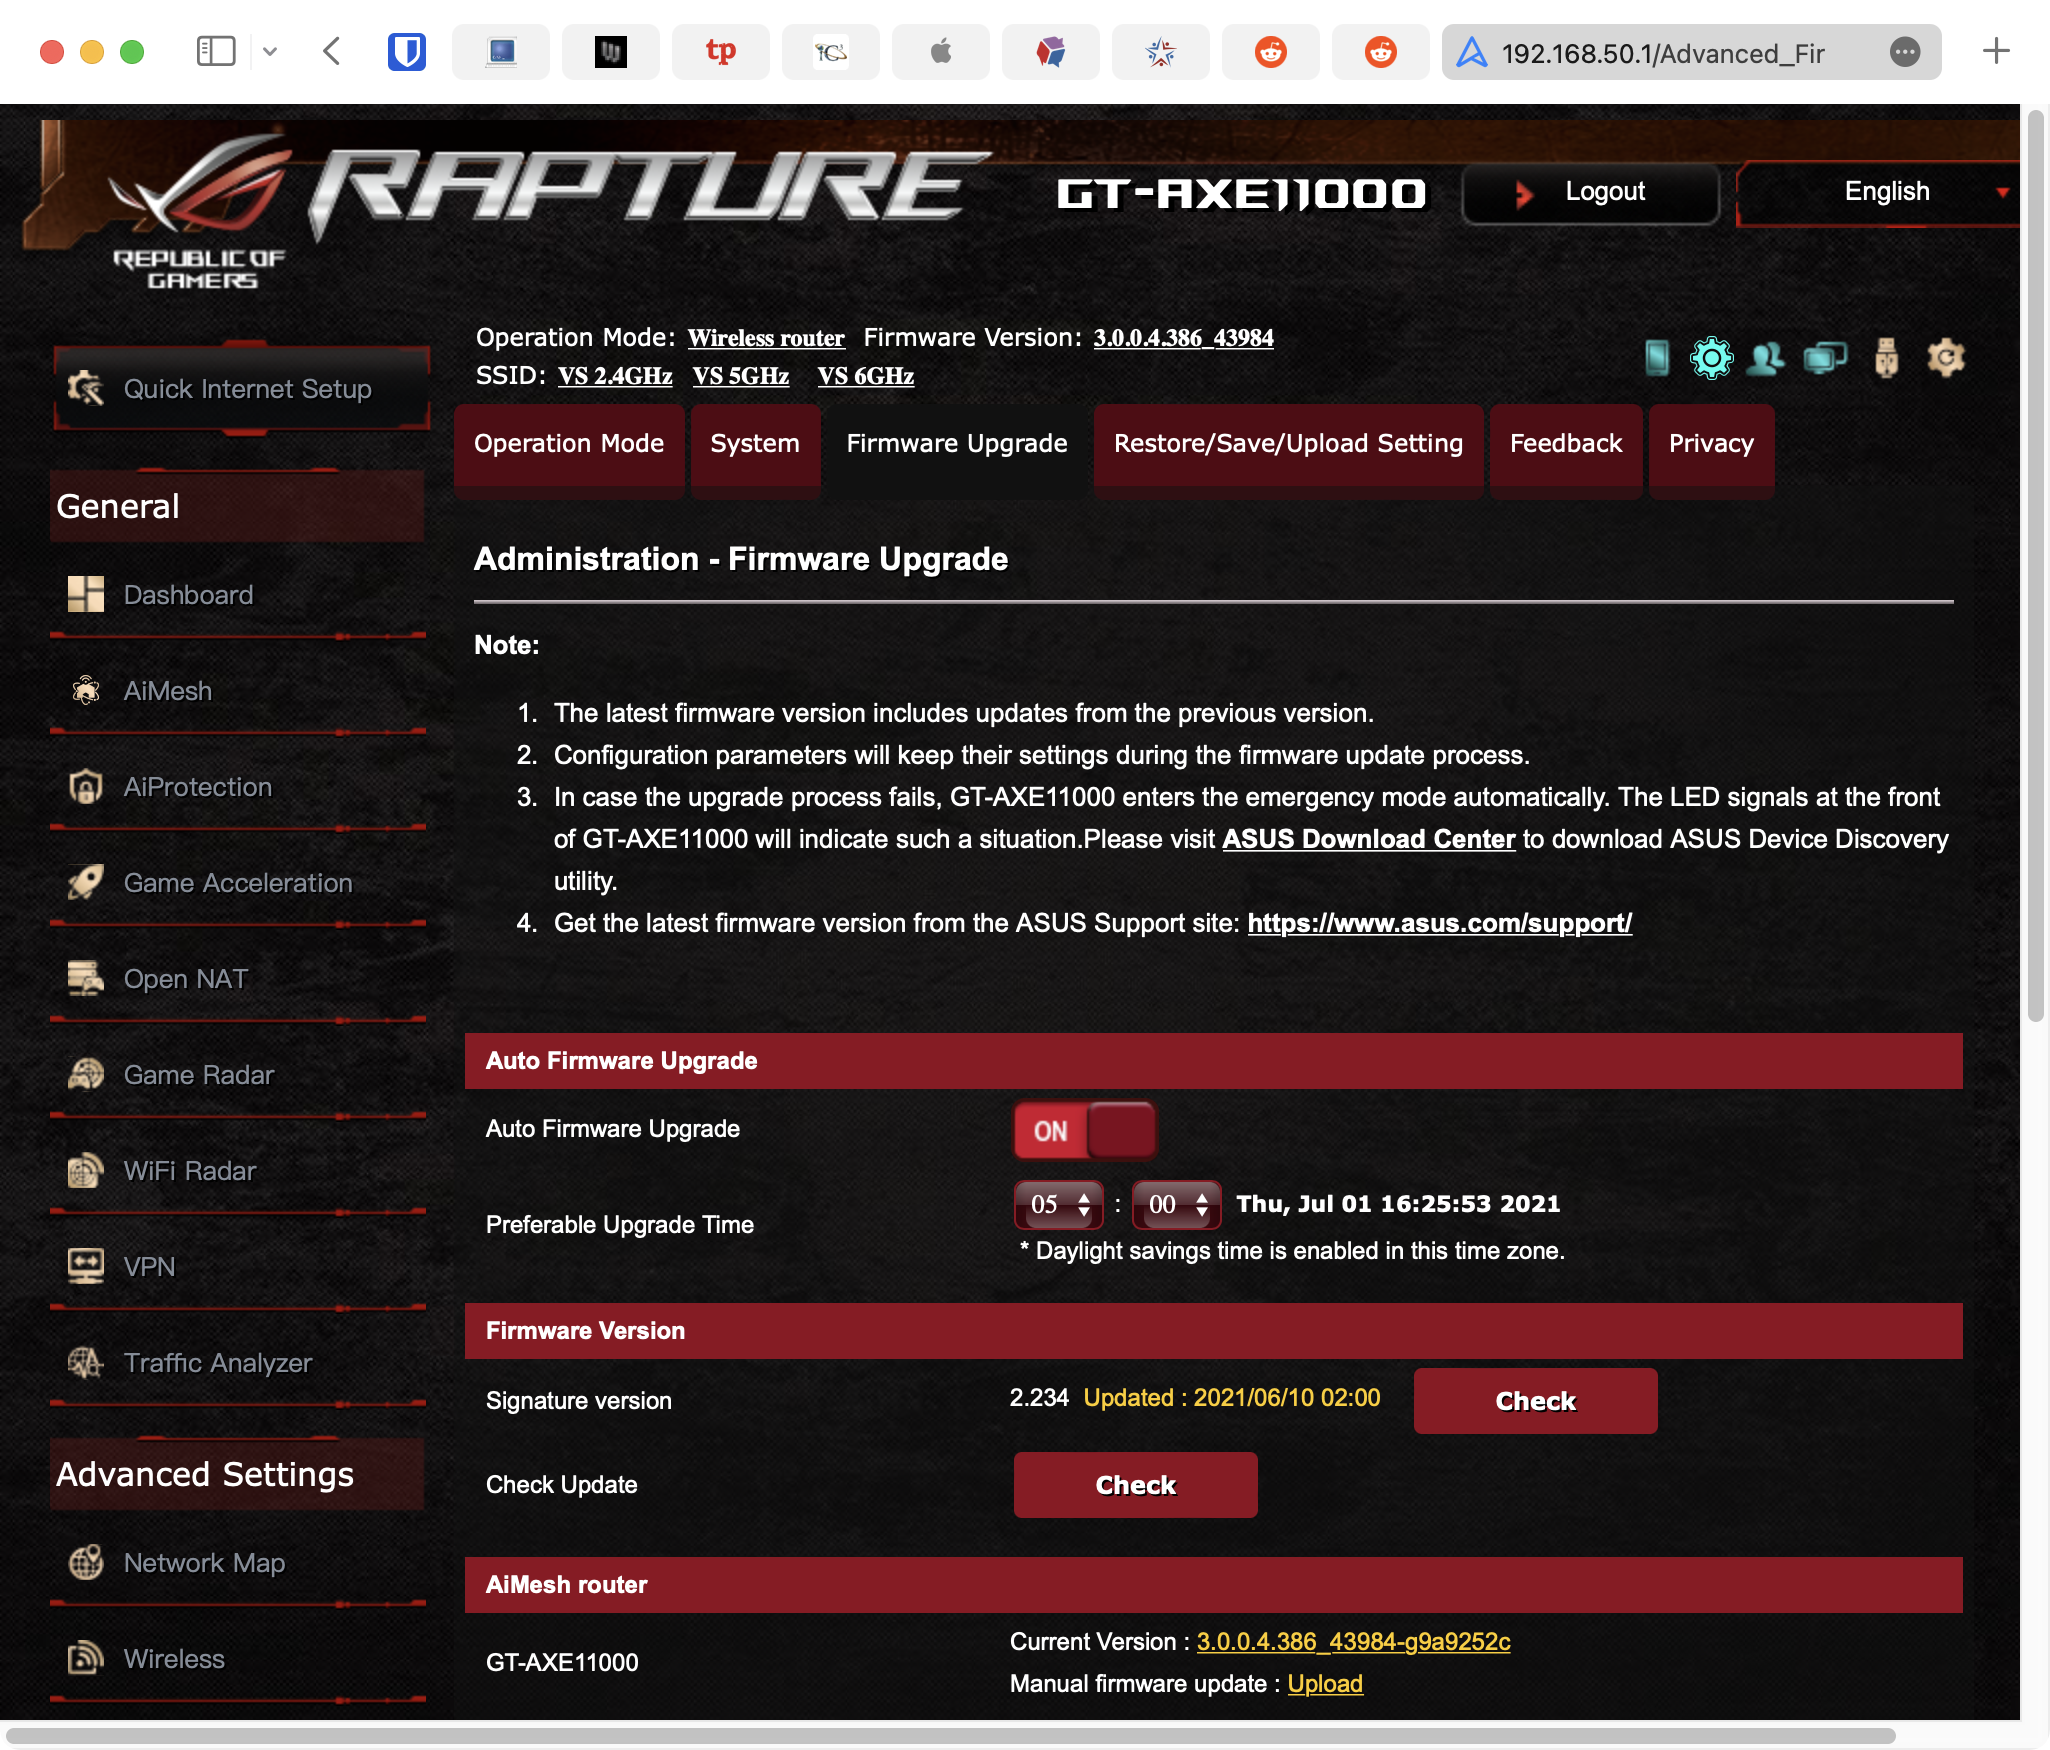
  6. Once into the device, look around for the firmware update area. The manual becomes your friend here.
  7. Tap the Update button. The download and update typically takes 5 minutes. During this time the device is offline–even to you.
  8. When the device comes back online, try to update again. Some devices can only update incrementally. I just finished with a device that had to be manually updated 4 times.
  9. Exit your browser and you are done! See, it really was easy!
Q: How to Configure VPN for IoT Devices?

Q: How to Configure VPN for IoT Devices?

A: VPN was initially designed to be used by computers. As such, there are software and network drivers to install and configure. The problem with IoT devices (Internet of Things, such as wireless thermostats, webcams, remote doorbells, wireless garage door openers, etc.) is that with almost no exceptions, developers have not included an option to add 3rd-party software and drivers. So by themselves, IoT devices cannot be secured.

BUT…

What if we were to do the following:

  • Create an encrypted wi-fi for the IoT device to communicate on between your router and the IoT device.
  • Enable VPN on the router, so that IoT data is encrypted between your router and your VPN provider.

Doing so makes it exceptionally difficult for your IoT data stream to be intercepted and harvested. No more threat of bad actors snooping on your home or business webcam, or remotely unlocking your digital door locks.

What Can We Do?

Encrypted Wi-Fi

The first step is to ensure your Wi-Fi router is configured properly for secure, encrypted networking.

The current encryption protocol of choice is called WPA3. Unfortunately, it has only been a standard for a year. There are few routers available to support it, and fewer IoT devices supporting it. However, I strongly recommend upgrading to a modem capable of WPA3 so that it is available as you upgrade your networkable devices.

My preference is for the ASUS brand of what are called Wi-Fi 6 or 6e routers. These are much faster than the previous generation, and support WPA3 and WPA2. I will use screenshots from the ASUS GT-AXE11000.

  1. Open the router control panel.
  2. From the sidebar select Wireless.
  3. Scroll down to the Wi-Fi channel you want to use for your IoT devices.
  4. Tap the Authentication Method. You will see a pop-up menu of all the available encryption options.
  5. Select WPA3-Personal, then configure the password.
  6. Save your changes.
  7. Test your IoT devices, computers, tablets, and mobile phones to determine if they can connect to WPA3.
  8. If all connect, we have rainbows and unicorns. If some devices cannot connect, you may need to change your Authentication Method to WPA2/WPA3.
  9. NOTE: Under no circumstances should you need to use WPA. This is a recipe for disaster. WPA has been broken, and any kid with 10 minutes of internet search will find the way to do it. Although WPA2 has also been broken, it is a more complex process.

Configure Your Router for VPN

The next step is to configure your router to connect to the internet via VPN. In this strategy, all traffic leaving the router is encrypted.

NOTE: Many mid-grade routers lack the ability to add VPN. This is a great time to invest in a modern, high-quality router that can add VPN, uses WPA3, and supports Wi-Fi 6.

  1. Subscribe to a quality VPN provider. I personally use NordVPN. 
  2. From your VPN provider website, download their opvn file. This is the driver to be added to your router.
  3. Open your routers control panel page.
  4. From the sidebar, select VPN.
  5. From the tabs, select Fusion VPN.
  6. Under the Server List section, tap Add Server.
  7. In the Add Server window, select OpenVPN tab.
  8. Enter your VPN subscription username and password.

  9. Tap the Choose File button, then locate and select the opvn file downloaded in step 2.
  10. Tap the Upload button to upload the opvn file to your router.
  11. Tap the OK button.
  12. Returning to the main VPN page, in the Exceptions List area, tap the Add Exceptions.
  13. In the Create New Policy page, from the Client Name field, tap the drop down arrow to see all devices connected to your router.
  14. Select one that you wish to be protected by VPN.
  15. In the Connection Name field, select the name of the VPN policy you created in step 8.
  16. Tap the OK button.
  17. Repeat steps 12-16 for every other device to be protected by VPN.

Yes, there are a lot of steps, but they are all easy, and the entire process may take under 10 minutes – AND you get to secure all your devices with VPN.

Should You Update Router and Modem Firmware?

It is Time For a New Router

Q: When is it a good time to replace my current router with a new unit?

A: NOW! (Really)

What is a Router?

A router is a hardware network device that allows other devices (such as computers, tablets, mobile phones, printers, smart watches, smart doorbells, webcams, etc.) to connect to your local area network (LAN), and then trough the router, communicate with each other (such as sending a file to be printed, or opening a file on the server), and connect to the internet.

As the router is the hub of all of your network activity, a failure or hack at the router means a catastrophic failure of your network and all devices, and a potential hack of all your devices.

Why Replace My Router Now?

Network technologies have changed significantly in just the past few years. If your router is more than 2 years old, it very likely is no longer considered highly secure. This puts ALL of your data from ALL of your devices at risk.

In addition, many of the latest routers include additional security software to help monitor your devices and network for breaches. Earlier routers pretty much let data in and out without any examination.

At the enterprise level (large businesses) Cisco, Jupiter, HP are among the go-to providers of networking equipment. These units have always had security software built-in. They also typically have upgrade options to ensure your always have the latest and greatest features available to you.

This is why these units cost upwards of 5x the cost of prosumer models.

For the purposes of this blog, I’ll not discuss the enterprise, as it is a rarified field demanding one-on-one discussions for your particular environment.

But, for the home user and the small and medium-sized business, prosumer routers can have excellent performance and features, at very affordable prices.

Wi-Fi Encryption

Earlier wi-fi router models used WPA2 for their encryption protocol. Ratified in 2004, this was considered fairly secure. However, it could be hacked. Which is one of the reasons it was replaced in 2018 with WPA3 encryption. Routers with WPA3 capability started shipping in 2019.

Note: If you have older devices (computers, tablets, etc.), they also may be capable of using WPA2, but not WPA3. This makes your older device a security vulnerability. And if you don’t replace the older device, you will need to enable WPA2 on your router for the older device to use the network. This immediately makes the entire network vulnerable.

How to Enable WPA3

For almost all routers, enabling WPA3 is not much more than a tap. For this example, I’m using my favorite prosumer router, the ASUS GT-AXE11000.

  1. Open a web browser to the control panel of your router.
  2. Navigate to the Wi-Fi settings.
  3. Select WPA3-Personal.
  4. Save.
  5. The router may restart to initialize the new encryption.

ASUS WPA3

If you don’t see the option for WPA3, it is time to replace your router with a current model.

Network Security

All consumer-grade, and most prosumer-grade routers lack significant network security beyond a rudimentary firewall. One of the reasons I love the ASUS line is the higher-end models include very good network security.

Here you can see how it protects the network by:

  • Self-analysis, pointing the administrator to configurations that my not be fully secure.
  • Logging the malicious sites users or malware have attempted to access and have been blocked.
  • Two-Way IPS blocks attempts malicious packets from reaching your router or network devices.
  • Infected Device Prevention and Blocking prevents infected devices from releasing your sensitive information.ASUS Network Security

Replacing Your Old Router With New

Older routers were pretty much a plug-and-play device, and any user could set it up.

The only downside to the newer security-conscious devices is they do require some reading to do the job right. And even then, I recommend hiring an IT professional to spend the hour or two to properly install and configure. In the case of the ASUS, there are over 100 settings that require attention.

Another Bonus With Your Upgrade–Speed

Although security is the main reason to upgrade your router, there is a bonus available – better performance and speed.

Older routers will typically max out on their wi-fi speed at 300, 600, perhaps 1000 mbs. In addition, they are limited to the 2.4 GHz and 5 GHz channels. The 2.4 GHz channel is overly crowded – sharing bandwidth with microwave ovens, garage door openers, wireless phones, bluetooth devices, and almost any other wireless device. Think of driving in Los Angeles freeway traffic. The posted speed limit may be 65 mph, but with bumper-to-bumper traffic, everyone is going 15 mph.

Newer routers will still have the legacy 2.4 GHz and 5 GHZ to support older devices, but may now include the 6 GHz channel. As this is newly opened, few devices use it, so it is just you and a few other cars on the freeway.

Should You Update Router and Modem Firmware?

Netgear Router Bug Allows Full Remote Access

Unless you have been living in an ice cave (hmmm, perhaps I’ve been using that phrase just a tad too often), you already know how vital it is to keep your operating system and applications fully up to date. This is because most updates include security enhancements and patches to vulnerabilities.

But few people give thought to updating the firmware of their routers and modems–and this is perhaps even more important. Because if there is a vulnerability in your router or modem, a bad actor can have full access to your network and all the data that travels along it.

And that has just happened, again.

Microsoft discovered a bug in Netgear router firmware that could give the bad actor access.

But this article is not to point the finger at Netgear. These vulnerabilities crop up on almost all software and firmware. This article is about pointing the finger at your modem or router, and question when was the last time you verified the firmware is up to date?

Every modem and router – even from the same manufacturer – may have wildly different interfaces to check and update firmware. Because I have a CenturyLink ActionTec modem and an ASUS router on my network, I’ll use them as examples.

CenturyLink Modem

  1. Log on to the modem. In most cases, this is done by opening a browser, then entering the modem IP address. This is often 192.168.0.1.
  2. Select Utilities, or sometimes Advanced  or Administration.
  3. In the case of this modem, then select Upgrade Firmware  from the sidebar:
  4. Tap Download to download the firmware from the manufacturer to your computer.
  5. Tap Choose File to locate and select the downloaded file.
  6. Tap Upgrade Firmware to upgrade your modem.
  7. In a few minutes, the modem will reboot with the latest and greatest firmware installed.

ASUS Router

  1. As with the CenturyLink modem, open a browser to the IP address of the router. This is often 192.168.0.1.
  2. Log in to the router.
  3. Tap Administration.
  4. Tap Firmware Upgrade. In the case of modern ASUS devices, they have the option to automatically check daily for updates. You can see that I have my Auto Firmware Upgrade switch set to On.

  5. To manually check or to verify, next to the Check Update text, tap Check.
  6. If there is a new firmware available, tap Download.
  7. Once the download completes, tap Upload.
  8. In a few minutes the router will reboot with the latest and greatest firmware.

How Often Do I Need to Check for Firmware Updates?

Your operating system can be configured to auto-check daily. The macOS App Store can be configured to check for application updates constantly. Although Windows doesn’t have a built-in updater for app acquired from other than the Microsoft Store, there are free automatic updaters available. But your modem and router will require manual checks (unless you have one of the few that automatically updates).

I recommend putting this on your monthly tickler file, so that your firmware is never more than a month out of date. Of course, more often wouldn’t hurt 😉


Automatically Protect All Devices From Internet Malware and Adult Content

Automatically Protect All Devices From Internet Malware and Adult Content

I just love it when with just a few mouse taps I can add a solid layer of security to all the devices under my roof. It’s just icing on the cake when it’s free!

The Problem

All of the internet-connected devices under your roof need to communicate over the internet in order to function. This includes computers, tablets, smartphones, webcams, smartwatches, smart doorbells, smart thermostats, printers, and more.

With your computers, tablets, and smartphones, you can add a layer of protection against malware by installing quality antimalware software. But what about your printer, smartwatch, doorbell, thermostat… you get the picture. Each of these smart devices are open to a breach, and few offer any option to install or configure security.

The other possible problem is adult content. Should you be a parent that would prefer little Jane and Johnny to not have access to adult content, it can be a full-time job playing content cop.

The Solution

All of your home and business devices must connect to the internet through your router. Inside of each router is a setting specifying which Domain Name Server (DNS) the router will use to learn where to direct this internet traffic. If a DNS server was knowledgeable about which web addresses held malware or adult content, the DNS could pass this info along to the router, blocking access to these sites.

Lucky you! There are DNS servers with this knowledge, and Cloudflare offers them at no charge.

The How To

If you would like to block known malicious and adult content sites from all of your home and business devices, you just have to change your router DNS settings. By default, most routers use your internet provider’s DNS servers. You will change this IP address to those of Cloudflare.

CenturyLink Modem

Every router has a unique interface. In the example below I’m using a CenturyLink Actiontec C3000A.

  1. Log in to the modem. If you aren’t familiar with the process, call your internet provider for instructions.
  2. From the menu bar, select Advanced Setup.
  3. From the sidebar, select DHCP Settings.
  4. In the main area of the page, scroll down to 5. Set the DNS servers allocated with DHCP requests.
  5. From this area, select Custom Servers.
  6. For malware only protection, set the Primary DNS to 1.1.1.2, and Secondary DNS to 1.0.0.2. For malware and adult content protection, set the Primary DNS to 1.1.1.3, and Secondary DNS to 1.0.0.3
  7. Tap the Apply button.
  8. Your modem may reboot. The protection will be in place immediately.

It’s Your Data… Protect It

Most people ignore their cybersecurity and internet privacy because they think it is too difficult or expensive. But what if it was fast, easy, and (almost) free? Our guides have been written by certified experts, with step-by-step illustrated instructions so that even a child can harden your security like a pro.

Visit https://thepracticalparanoid.com for the easiest, most comprehensive cybersecurity and internet privacy guides you can buy. Guaranteed!

80% of Orgs That Paid Ransom Were Hit Again

80% of Orgs That Paid Ransom Were Hit Again

A new study by Cyberreason has found that 80% of organizations that were hit with ransomware and paid to get the decryption key, were then hit once again with another ransomware.

Approximately 50% of the new attacks were from the original criminals, and 50% were from new criminals.

The study also found that the top two solutions to help prevent a successful attack are security awareness training and security operations.

From my 30+ years of experience, those organizations and individuals that do not implement security awareness training and security operations do so primarily because they believe it is too difficult, time-consuming, or expensive to do so.

That may be true if you have to meet HIPAA, SEC, or Federal Contractor compliance. But the individual, household, and business can successfully implement ransomware, hacking, cybersecurity, and internet privacy defenses in just one day!

The Practical Paranoid Security Essentials DIY books have been walking users with no technical background through securing their computers, tablets, phones, networks, data, and privacy for over eight years. Easy enough for junior high students and my 86 years old aunt Rose, and comprehensive enough for IT professionals.

The easiest, most comprehensive work of its kind. We even guarantee your satisfaction!

Visit ThePracticalParanoid.com to get your copy of the best-selling cybersecurity guide available.

Amazon Set to Share Your Internet With Neighbors – How to Opt Out

Amazon Set to Share Your Internet With Neighbors – How to Opt Out

Amazon Set to Share Your Internet With Neighbors – How to Opt-Out

Come this Tuesday, June 8, 2021, Amazon will launch the Amazon Sidewalk service. This service for Echo and Ring devices automatically opts-in to share your internet bandwidth with other Amazon devices in the neighborhood.

At first glance, this service is a great idea. Share a small slice of your internet bandwidth – 80Kb/s and a 500Mb monthly cap – with other Echo and Ring devices that have lost connection with their home wi-fi. For example, if your next door neighbors’ Ring doorbell loses connection with the home wi-fi, the Ring doorbell will automatically connect with the neighbor’s home wi-fi for uninterrupted service. Or if a dog wearing a Tile escapes from their yard, as long as the dog is within range of a network using Amazon Sidewalk, the Tile will accurately report the location of the dog.

Add on to this service that it is free to Echo and Ring customers (well, at least initially), and it is a great deal.

However, there are only a few big-tech companies that have proven to handle internet privacy responsibly, and Amazon is not one of them.

The Amazon Sidewalk white paper states that any sensitive data transmitted through Sidewalk is encrypted and that Amazon does not have a way to decrypt the packets. If that is true, they need to start hiring better engineers. Even if it is true, very serious hacks of secure systems is a daily news item.

Perhaps my biggest gripe is that the system is set to automatically opt-in. I’ll take this as tacit acknowledgement by Amazon the many/most of it’s customers would choose to opt-out instead.

What You Can Do – Opt-Out

If you have an eligible Echo or Ring device and do nothing, you are automatically part of the Amazon Sidewalk system.

If you prefer to not be a part of the Amazon Sidewalk system, follow these steps:

For Amazon Echo Device Owners

  1. Open your Amazon Alexa App.
  2. Select the More option in the bottom right corner of your screen.
  3. Select Settings > Account Settings > Amazon Sidewalk.
  4. Toggle the Amazon Sidewalk to Disabled.
  5. Close the Amazon Alexa app.

For Amazon Ring Device Owners

  1. Open your Ring app.
  2. Select the 3-line icon to open the menu, then go to Control Center > Amazon Sidewalk.
  3. Toggle the Amazon Sidewalk to Disabled.
  4. Close the Ring app.

Should You Update Router and Modem Firmware?

It’s Time to Upgrade Your Router

It’s Time to Upgrade Your Router

Chances are there are a couple of things about your current router that you would be much better off without.

But first, let’s discuss what is a router!

What Is a Router

A router is a hardware device that allows two networks to communicate with each other. The most common example is the router in your home or office, which allows your Local Area Network (LAN) to communicate with the Wide Area Network (WAN) provided by your Internet Service Provider. Without your router, it is likely all of the devices within your home or office would still be able to print and file share amongst each other, but browsing the internet, sending and receiving email, and even watching Netflix would not be possible.

Routers may provide connection to your LAN devices via ethernet (wired) or Wi-Fi (wireless).

Router Performance

A router may also be the weak point for both security and speed.

Lower-end or older routers are designed to work with just a few LAN devices. As the number of LAN devices increases, the router chipset becomes stressed attempting to handle the additional work. This results in slower network and internet speeds, router freezes, and odd behaviors like not allowing some devices to connect.

Higher-end and newer routers are designed to handle more LAN devices without overstressing the chipset.

How many devices do you currently have on your network? It’s quite easy to blow past the 5-10 devices your router is likely designed to handle. For example, in my two-person home we have:

  • 6 computers
  • 1 smartwatch
  • 3 smartphones
  • 2 printers
  • 4 security cameras
  • 1 security doorbell
  • 1 hot water tank leak detector
  • 6 smartTV’s

For a total of 24 devices on our Wi-Fi network.

Once you add in visiting friends or a business meeting, where each person may come with 2-3 devices (smartwatch, computer or tablet, and smartphone), and those numbers can easily hit 50+ devices.

If you have been unhappy with your LAN or WAN performance, the solution may be as simple as a new router that can easily handle all your devices.

Router Security

As is typical, security is my bigger concern.

Older routers are designed with WPA or WPA2 (Wi-Fi Protected Access). This protocol is intended to help keep all Wi-Fi data secure. But as you know, security and privacy are a cat-and-mouse game. WPA is now easily cracked and should never be used. WPA2 can be cracked, although it takes some determination.

In January 2018, WPA3 was released. To date, it is the most secure option available and is generally considered uncrackable (although testing has found some flaws). If your router has WPA3, network security should no longer be your biggest concern.

Modern Router Performance and Security

With routers that have first been available for sale since 2018, WPA3 security is included. So any modern router has the best security built-in.

In addition to WPA3 security, modern routers that have first been available for sale since March 2021 will have a huge performance boost in the form of 802.11ax (Wi-Fi 6). Wi-Fi 6 not only has faster performance overall than the previous 802.11ac but can handle far more devices and traffic without stress. In fact, with a Wi-Fi 6 router, your Wi-Fi 6 devices can communicate faster over Wi-Fi than over ethernet (based on proximity).

There is a recent update to Wi-Fi 6 called Wi-Fi 6E. Wi-Fi 6E includes a frequency range that hasn’t been used before (6GHz). If you have new devices that can operate on that frequency, they can operate even faster as their channel won’t be congested and competing with other devices.

At the moment, there are only a few devices that are capable of using Wi-Fi 6E, but most new devices from now on will include it.

Finding a Wi-Fi 6 or 6E Router

Browsing over to Amazon, then searching for “router Wi-Fi 6” will display most of the current crop of routers. There are more than a dozen quality manufacturers, but my preference for most home and small-medium-sized businesses is ASUS. ASUS is consistently among the top-rated for:

  • Quality parts
  • Quality construction
  • Overall performance
  • Features
  • Security

High-End

At the top of the heap is the ASUS GT-AXE11000. It simply doesn’t get any more secure, faster, or more expensive than this. This unit is tri-band, including 2.4 GHz, 5 GHz, and 6 GHz, making it future-proof (well, when it comes to technology, that means it should serve you well for the next 5 years). As with all of the better ASUS products, it includes Trend Micro security, automatically checking for malware, malicious websites, and other things that cause me nightmares.

Midrange

The ASUS GT-AX11000 is the GT-AXE11000’s little brother. They look similar and have similar specs. Where the AX11000 is different is that its tri-band is 2.4 GHz, and two 5 GHz bands. Having two 5 GHz bands will make this unit a better solution today (as there are so few 6 GHz devices to connect with it), but it isn’t future-proof. As you replace your current devices (computers, tablets, phones, etc.) the new devices will be 6GHz.

Low-End

If your needs are modest and have only around 5-10 devices to connect to your router, you will be quite happy with the ASUS AX6100 router. As with my other two choices, this comes with Trend Micro security, and is tri-band, with 2.4 GHz, and 2 5 GHz bands.

Configuring Your Router

If there is a downside to using a better router, it is that they are not plug-and-play. They do require a small bit of configuration. But it is nothing you can’t do with a little help from your friends 😉

Although every router configuration portal is different, I’ll show how the GT-AXE11000 looks.

  1. Connect the router to your network.
  2. Open a browser, then enter the router IP address. The router authentication screen opens.
  3. Enter the router default administrator name and password, then tap OK.
  4. In the configuration portal, from the sidebar, select Wireless. The main area of the page allows the configuration of the three bands (in this case, 2.4 GHz, 5 GHz, and 6 GHz).
  5. For each of the bands, in the Authentication Method areas, select WPA3 Personal.
  6. Tap the Save button, then exit from the configuration portal.
  7. On each of your devices that will connect via Wi-Fi to the router, you will need to reconnect by selecting the Wi-Fi network, enter the password, then tap OK or Connect.
  8. That’s it! See, not so tough.