A: VPN was initially designed to be used by computers. As such, there are software and network drivers to install and configure. The problem with IoT devices (Internet of Things, such as wireless thermostats, webcams, remote doorbells, wireless garage door openers, etc.) is that with almost no exceptions, developers have not included an option to add 3rd-party software and drivers. So by themselves, IoT devices cannot be secured.
BUT…
What if we were to do the following:
- Create an encrypted wi-fi for the IoT device to communicate on between your router and the IoT device.
- Enable VPN on the router, so that IoT data is encrypted between your router and your VPN provider.
Doing so makes it exceptionally difficult for your IoT data stream to be intercepted and harvested. No more threat of bad actors snooping on your home or business webcam, or remotely unlocking your digital door locks.
What Can We Do?
Encrypted Wi-Fi
The first step is to ensure your Wi-Fi router is configured properly for secure, encrypted networking.
The current encryption protocol of choice is called WPA3. Unfortunately, it has only been a standard for a year. There are few routers available to support it, and fewer IoT devices supporting it. However, I strongly recommend upgrading to a modem capable of WPA3 so that it is available as you upgrade your networkable devices.
My preference is for the ASUS brand of what are called Wi-Fi 6 or 6e routers. These are much faster than the previous generation, and support WPA3 and WPA2. I will use screenshots from the ASUS GT-AXE11000.
- Open the router control panel.
- From the sidebar select Wireless.
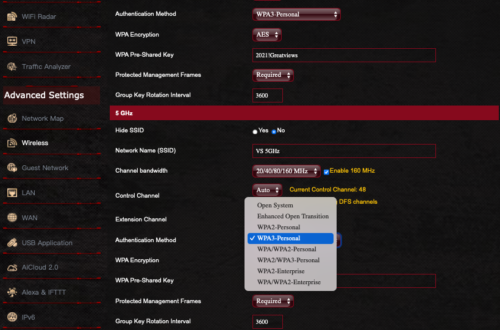
- Scroll down to the Wi-Fi channel you want to use for your IoT devices.
- Tap the Authentication Method. You will see a pop-up menu of all the available encryption options.
- Select WPA3-Personal, then configure the password.
- Save your changes.
- Test your IoT devices, computers, tablets, and mobile phones to determine if they can connect to WPA3.
- If all connect, we have rainbows and unicorns. If some devices cannot connect, you may need to change your Authentication Method to WPA2/WPA3.
- NOTE: Under no circumstances should you need to use WPA. This is a recipe for disaster. WPA has been broken, and any kid with 10 minutes of internet search will find the way to do it. Although WPA2 has also been broken, it is a more complex process.
Configure Your Router for VPN
The next step is to configure your router to connect to the internet via VPN. In this strategy, all traffic leaving the router is encrypted.
NOTE: Many mid-grade routers lack the ability to add VPN. This is a great time to invest in a modern, high-quality router that can add VPN, uses WPA3, and supports Wi-Fi 6.
- Subscribe to a quality VPN provider. I personally use NordVPN.
- From your VPN provider website, download their opvn file. This is the driver to be added to your router.
- Open your routers control panel page.
- From the sidebar, select VPN.
- From the tabs, select Fusion VPN.
- Under the Server List section, tap Add Server.
- In the Add Server window, select OpenVPN tab.
- Enter your VPN subscription username and password.
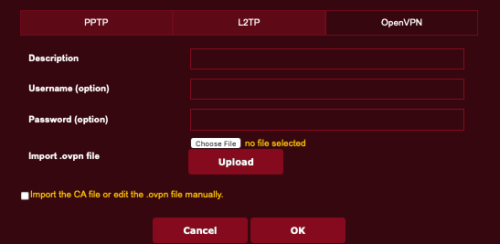
- Tap the Choose File button, then locate and select the opvn file downloaded in step 2.
- Tap the Upload button to upload the opvn file to your router.
- Tap the OK button.
- Returning to the main VPN page, in the Exceptions List area, tap the Add Exceptions.
- In the Create New Policy page, from the Client Name field, tap the drop down arrow to see all devices connected to your router.
- Select one that you wish to be protected by VPN.
- In the Connection Name field, select the name of the VPN policy you created in step 8.
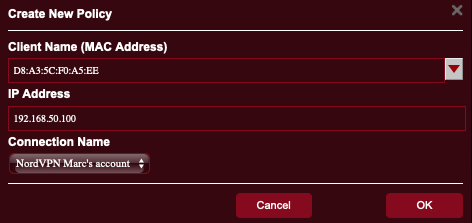
- Tap the OK button.
- Repeat steps 12-16 for every other device to be protected by VPN.
Yes, there are a lot of steps, but they are all easy, and the entire process may take under 10 minutes – AND you get to secure all your devices with VPN.