pixel
Personal Data Tracking Report: Google Worst, Apple Best

Personal Data Tracking Report: Google Worst, Apple Best

As reported in the August 25, 2022 edition of AppleInsider (https://appleinsider.com/articles/22/08/25/google-tracks-39-types-of-personal-data-apple-tracks-12), of the five major Big Tech firms, Google tracks more personal data than any other, and Apple tracks the least.

Google was found to track 39 data points per user, Twitter tracks 24, Amazon 23, Facebook 14, and Apple 12. According to the report, Apple tracks only data that is required to maintain the user account.

Unfortunately, there is no documentation on what data points are tracked.

WHY DO YOU CARE?

Perhaps you don’t care. But if you do, this information is important so that you can make fit decisions and choices for how you use your computer, software, and internet.

WHAT CAN YOU DO?

Although I’ve written 18 books on what you can do about personal data tracking, I’m also not foolish enough to think everyone will rush out and buy an armful of them (but please do). There are some simple steps anyone can take to stem the hemorrhaging of your data into government and advertiser servers:

  • Use a privacy-centered browser. These include: Safari, Brave, and Firefox. All free.
  • Use a quality VPN (Virtual Private Network) anytime you are online. My personal choice is NordVPN.
  • Use a unique and strong password (15 or more characters) for every website and service.
  • Use a quality Password Manager to store your overflowing list of unique and strong passwords. My personal favorite is Bitwarden. $10/year.
  • Enable 2-Factor Authentication (also called Multi-Factor Authentication or One Time Use Password) for every site and service that provides for it. Then use Bitwarden to generate your 2-Factor Authentication codes.
  • Use end-to-end encrypted text, phone, and video conference. My personal choice is Signal. Free.
  • Use a quality anti-malware utility. My personal choice is Bitdefender.
  • Only download software from legitimate sources. This is usually restricted to either the developer or the Apple Store, Google Play Store, or Microsoft Store.
  • Verify at least weekly that your operating system and applications are current.
  • Review your security and privacy settings for each of your social media platforms.

WANT TO BE PROTECTED LIKE THE PROFESSIONALS?

Practical Paranoia Security Essentials books have been the best-selling, easiest, and most comprehensive DIY guides for Android, ChromeOS, iOS, macOS, and Windows for nine years. Written by cybersecurity and internet privacy professionals for new and non-technical users, the reader is taken through an illustrated step by step process to secure their data in the same way the government secures their systems. We’ve made it so easy that anyone can confidently do it!

Hikvision Camera Security Alert

Hikvision Camera Security Alert

I normally don’t post any of the daily cybersecurity alerts that post my desk. If I did, I would quickly fill up my 4TB local storage! But this is significant enough to warrant attention.

Hikvision is a highly popular camera manufacturer that is found around the world, with the USA having the second largest implementation–often as security video cameras. A severe security vulnerability was found last year, but it was reported 20220823 that over 80,000 of these units have not yet had their software updated.

Without the software security patch, these cameras are easily accessible by governments, criminals, and your everyday troublemaker.

To quote from the original source material:

Last year, Hikvision resigned from the Security Industry Association (SIA), the largest trade organization for surveillance vendors, after being accused of working with the Chinese Army on research to improve the ‘lethality’ of missiles.

Due to the one-two punch of the gaping and continuing vulnerability, and that Hikvision has resigned from the SIA, we can not recommend their use. We do recommend that should you have a Hikvision video camera in use, replace it ASAP.

Original source material: https://therecord.media/experts-warn-of-widespread-exploitation-involving-hikvision-cameras/


Q: How to Configure VPN for IoT Devices?

Q: How to Configure VPN for IoT Devices?

A: VPN was initially designed to be used by computers. As such, there are software and network drivers to install and configure. The problem with IoT devices (Internet of Things, such as wireless thermostats, webcams, remote doorbells, wireless garage door openers, etc.) is that with almost no exceptions, developers have not included an option to add 3rd-party software and drivers. So by themselves, IoT devices cannot be secured.

BUT…

What if we were to do the following:

  • Create an encrypted wi-fi for the IoT device to communicate on between your router and the IoT device.
  • Enable VPN on the router, so that IoT data is encrypted between your router and your VPN provider.

Doing so makes it exceptionally difficult for your IoT data stream to be intercepted and harvested. No more threat of bad actors snooping on your home or business webcam, or remotely unlocking your digital door locks.

What Can We Do?

Encrypted Wi-Fi

The first step is to ensure your Wi-Fi router is configured properly for secure, encrypted networking.

The current encryption protocol of choice is called WPA3. Unfortunately, it has only been a standard for a year. There are few routers available to support it, and fewer IoT devices supporting it. However, I strongly recommend upgrading to a modem capable of WPA3 so that it is available as you upgrade your networkable devices.

My preference is for the ASUS brand of what are called Wi-Fi 6 or 6e routers. These are much faster than the previous generation, and support WPA3 and WPA2. I will use screenshots from the ASUS GT-AXE11000.

  1. Open the router control panel.
  2. From the sidebar select Wireless.
  3. Scroll down to the Wi-Fi channel you want to use for your IoT devices.
  4. Tap the Authentication Method. You will see a pop-up menu of all the available encryption options.
  5. Select WPA3-Personal, then configure the password.
  6. Save your changes.
  7. Test your IoT devices, computers, tablets, and mobile phones to determine if they can connect to WPA3.
  8. If all connect, we have rainbows and unicorns. If some devices cannot connect, you may need to change your Authentication Method to WPA2/WPA3.
  9. NOTE: Under no circumstances should you need to use WPA. This is a recipe for disaster. WPA has been broken, and any kid with 10 minutes of internet search will find the way to do it. Although WPA2 has also been broken, it is a more complex process.

Configure Your Router for VPN

The next step is to configure your router to connect to the internet via VPN. In this strategy, all traffic leaving the router is encrypted.

NOTE: Many mid-grade routers lack the ability to add VPN. This is a great time to invest in a modern, high-quality router that can add VPN, uses WPA3, and supports Wi-Fi 6.

  1. Subscribe to a quality VPN provider. I personally use NordVPN. 
  2. From your VPN provider website, download their opvn file. This is the driver to be added to your router.
  3. Open your routers control panel page.
  4. From the sidebar, select VPN.
  5. From the tabs, select Fusion VPN.
  6. Under the Server List section, tap Add Server.
  7. In the Add Server window, select OpenVPN tab.
  8. Enter your VPN subscription username and password.

  9. Tap the Choose File button, then locate and select the opvn file downloaded in step 2.
  10. Tap the Upload button to upload the opvn file to your router.
  11. Tap the OK button.
  12. Returning to the main VPN page, in the Exceptions List area, tap the Add Exceptions.
  13. In the Create New Policy page, from the Client Name field, tap the drop down arrow to see all devices connected to your router.
  14. Select one that you wish to be protected by VPN.
  15. In the Connection Name field, select the name of the VPN policy you created in step 8.
  16. Tap the OK button.
  17. Repeat steps 12-16 for every other device to be protected by VPN.

Yes, there are a lot of steps, but they are all easy, and the entire process may take under 10 minutes – AND you get to secure all your devices with VPN.

Personal Data Tracking Report: Google Worst, Apple Best

Automatically Protect All Devices From Internet Malware and Adult Content

I just love it when with just a few mouse taps I can add a solid layer of security to all the devices under my roof. It’s just icing on the cake when it’s free!

The Problem

All of the internet-connected devices under your roof need to communicate over the internet in order to function. This includes computers, tablets, smartphones, webcams, smartwatches, smart doorbells, smart thermostats, printers, and more.

With your computers, tablets, and smartphones, you can add a layer of protection against malware by installing quality antimalware software. But what about your printer, smartwatch, doorbell, thermostat… you get the picture. Each of these smart devices are open to a breach, and few offer any option to install or configure security.

The other possible problem is adult content. Should you be a parent that would prefer little Jane and Johnny to not have access to adult content, it can be a full-time job playing content cop.

The Solution

All of your home and business devices must connect to the internet through your router. Inside of each router is a setting specifying which Domain Name Server (DNS) the router will use to learn where to direct this internet traffic. If a DNS server was knowledgeable about which web addresses held malware or adult content, the DNS could pass this info along to the router, blocking access to these sites.

Lucky you! There are DNS servers with this knowledge, and Cloudflare offers them at no charge.

The How To

If you would like to block known malicious and adult content sites from all of your home and business devices, you just have to change your router DNS settings. By default, most routers use your internet provider’s DNS servers. You will change this IP address to those of Cloudflare.

CenturyLink Modem

Every router has a unique interface. In the example below I’m using a CenturyLink Actiontec C3000A.

  1. Log in to the modem. If you aren’t familiar with the process, call your internet provider for instructions.
  2. From the menu bar, select Advanced Setup.
  3. From the sidebar, select DHCP Settings.
  4. In the main area of the page, scroll down to 5. Set the DNS servers allocated with DHCP requests.
  5. From this area, select Custom Servers.
  6. For malware only protection, set the Primary DNS to 1.1.1.2, and Secondary DNS to 1.0.0.2. For malware and adult content protection, set the Primary DNS to 1.1.1.3, and Secondary DNS to 1.0.0.3
  7. Tap the Apply button.
  8. Your modem may reboot. The protection will be in place immediately.

It’s Your Data… Protect It

Most people ignore their cybersecurity and internet privacy because they think it is too difficult or expensive. But what if it was fast, easy, and (almost) free? Our guides have been written by certified experts, with step-by-step illustrated instructions so that even a child can harden your security like a pro.

Visit https://thepracticalparanoid.com for the easiest, most comprehensive cybersecurity and internet privacy guides you can buy. Guaranteed!

Personal Data Tracking Report: Google Worst, Apple Best

Secure ALL Your Internet of Things with VPN

Secure ALL Your Internet of Things with VPN

Unless you have been living in an ice cave the past few years, you are sure to have heard the term “IoT” or “Internet of Things”. Given all the catastrophes each of us has had to deal with, you would be excused if you haven’t given this topic your attention. After all, we have been in survival mode.

Now that the election is over and you’ve gotten your shots, maybe you can take a few minutes to learn why IoT is vital to your cybersecurity and internet privacy.

What Is IoT?

The Internet of Things (IoT) is anything and everything that has an embedded sensor, software, or other technology for the purpose of connecting and exchanging data with other devices and systems over the internet.

Although you may not know it, you probably have a lot of IoT in your home and office. Items like:

  • Medical equipment (think heart monitors, CPAP machines, even the Help! I’ve fallen and can’t get up alerts.
  • Home automation, perhaps a water leak detector, smart thermostat, remote control lighting.
  • Smartwatch
  • iPhone or Android phone
  • Amazon Echo, Google Home, Apple HomePod, Samsung SmartThings Hub

… And Why Should I Care?

If you are like me, you may be just about cared-out by now. Between politics, climate collapse, pandemics, and discovering a few of my relatives are bat $#!* crazy, it’s getting more difficult by the day to care about new things.

But – you have to trust me on this – giving just a bit of thought to IoT is going to save you an armload of grief down the road.

Why?

Because even though you may do your best to secure your computers and mobile devices to help ensure your cybersecurity and internet privacy, few people give thought to securing their IoT. I mean, it’s only a doorbell (or thermostat, or voice-controlled TV, or, or, or…)

All these out-of-sight, out-of-mind devices are connected to your network. And if a criminal gains access to an IoT device, they gain access to your network, and may be able to view all of the data that travels through it – including usernames and passwords – and therefore have access to the keys to your kingdom.

Criminals are focusing attention on your IoT devices because they are often far easier to penetrate than servers, computers, and mobile devices. In fact, many of the older IoT devices (when it comes to technology, older may mean three years old) have no functional security at all!

Give Me an Example

How about:

  • A casino experienced a major data breach when criminals gained access to the network through a smart thermostat used in an aquarium.
  • A United Airlines flight was commandeered by a passenger who hacked the flight control system through the entertainment system.
  • Smart toasters were remotely hacked so they wouldn’t toast any bread the hacker considered unhealthy.
  • Freezers were remotely hacked to automatically shut down when ice cream was detected.
  • The Mirai malware takes over IoT devices such as cameras and monitors, turning the device into a bot.
  • A car was remotely hacked over the internet giving the hacker full access to the A/C, steering, and turning the engine off.
  • The FDA recalled almost 500,000 pacemakers over fears they could be remotely hacked.

As I’ve said far too often, the list goes on and on, but we both have a life to lead.

But What Can I Do About It?

PLENTY! In fact, so much that I’m writing a book on the subject.

But until that is released, one of the most important things you can do is to connect your IoT devices to the internet via a Virtual Private Network (VPN).

If you have been following me, you already know I think your computer, phone, and tablet should always and only connect to the internet via VPN. This encrypts data between your device and the internet.

Few people do the same for their IoT devices. But that is no different than locking the front door as you leave for vacation, but leaving the backdoor open.

Very few IoT devices have the ability to do VPN by themselves. No worries! You can configure your router to do the work for you.

Some Background on VPN for Routers

Not all routers have the ability to work with VPN. So if yours cannot, it is definitely time to replace it. Routers are a relatively low-cost item, and certainly far less costly than a data breach. Think draining your bank account, identity theft, someone buying a home using your ID, unauthorized credit card charges, and more.

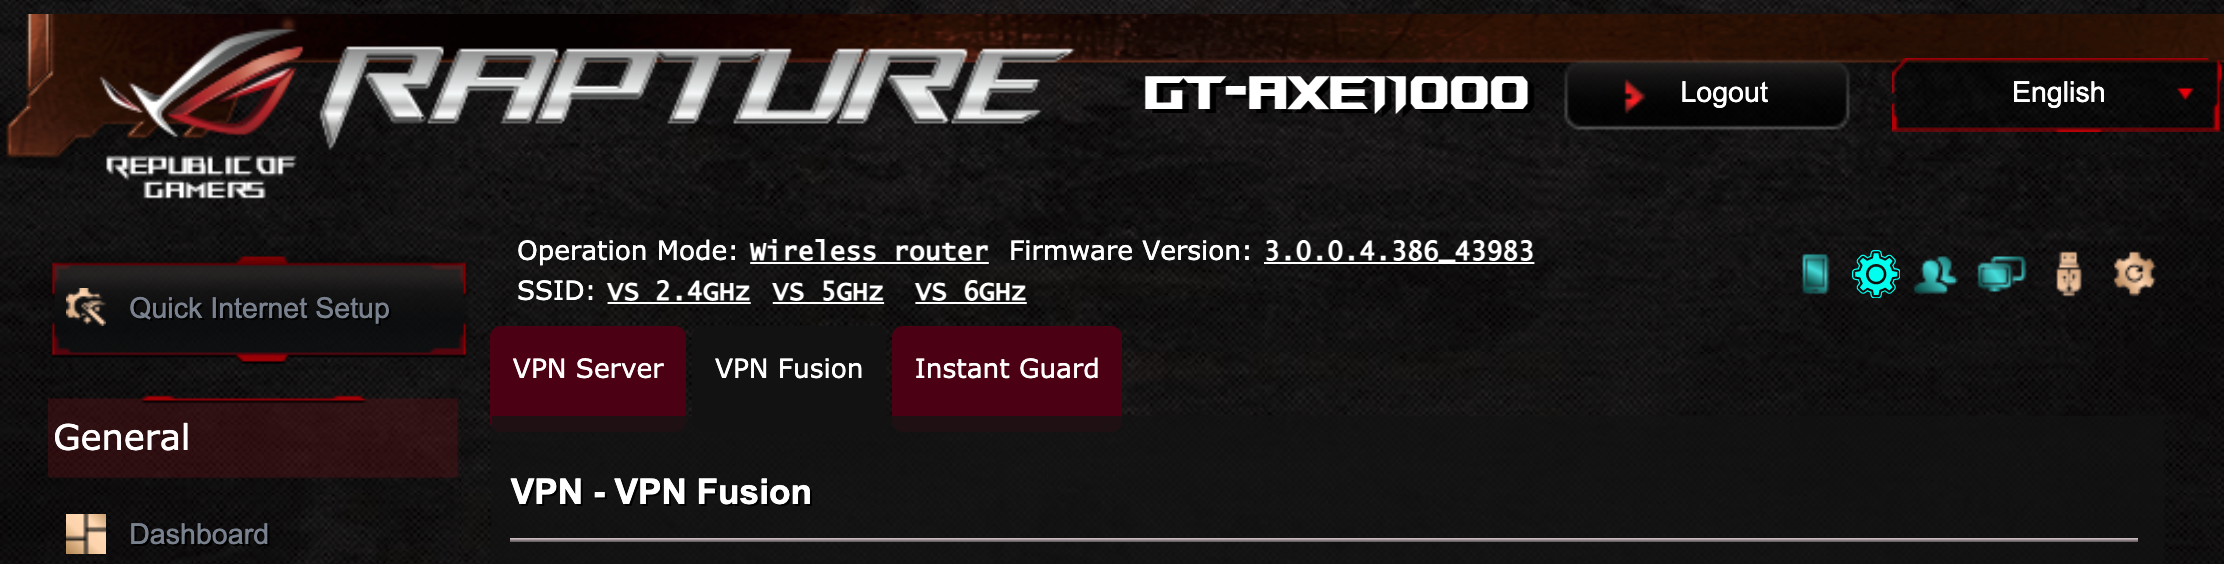
I’m fond of ASUS routers. They are a high-quality prosumer product. For my example, I’m using their latest & greatest router, the GT-AXE11000. But they have several less expensive models that work exactly the same.

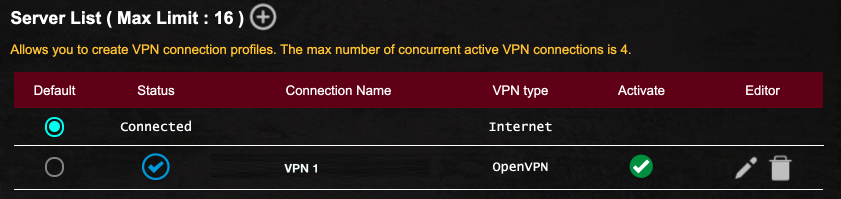
What needs to be done to secure your home and office IoT is to enable VPN on your router, then configure the router to connect your target devices to that VPN. In the case of my router, I can create up to 16 different concurrent VPN configurations, allowing me to balance security, performance, and apparent geo-location on a device-by-device basis.

Prerequisites:

  • A VPN account. There are literally thousands of VPN providers available. Most of them throw red flags for me. Many are criminals. I recommend NordVPN. Reasonable cost, allows multiple devices, consistently ethical, and they provide detailed instructions how to configure many routers to work with their service.
  • A router that can be configured to work with your VPN provider.

Step-By-Step Configure a Router For VPN

  1. Get a VPN account. For this example, I’m using NordVPN.
  2. Get a router that can be configured to work with your VPN provider. for this example, I’m using the ASUS GT-AXE11000.
  3. Open a new browser window to your VPN provider support page. They will have a VPN configuration file to be downloaded for upload to your router. Download the file.
  4. Connect and log in to the router control panel.
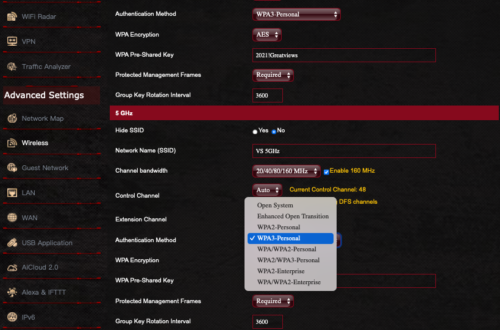
  5. In the router control panel, select the VPN tab or section. For my router, VPN is selected from the sidebar.
  6. Select the type of VPN to be used. For my router, the options are VPN Server, VPN Fusion, and Instant Guard. VPN Fusion is what is needed. Most other routers call this VPN Client.
  7. Scroll down to the Server List area. This is where you configure your various VPN setups.
  8. Tap the + button to create a new server.
  9. Tap the VPN protocol you want to use. In most cases this is OpenVPN.
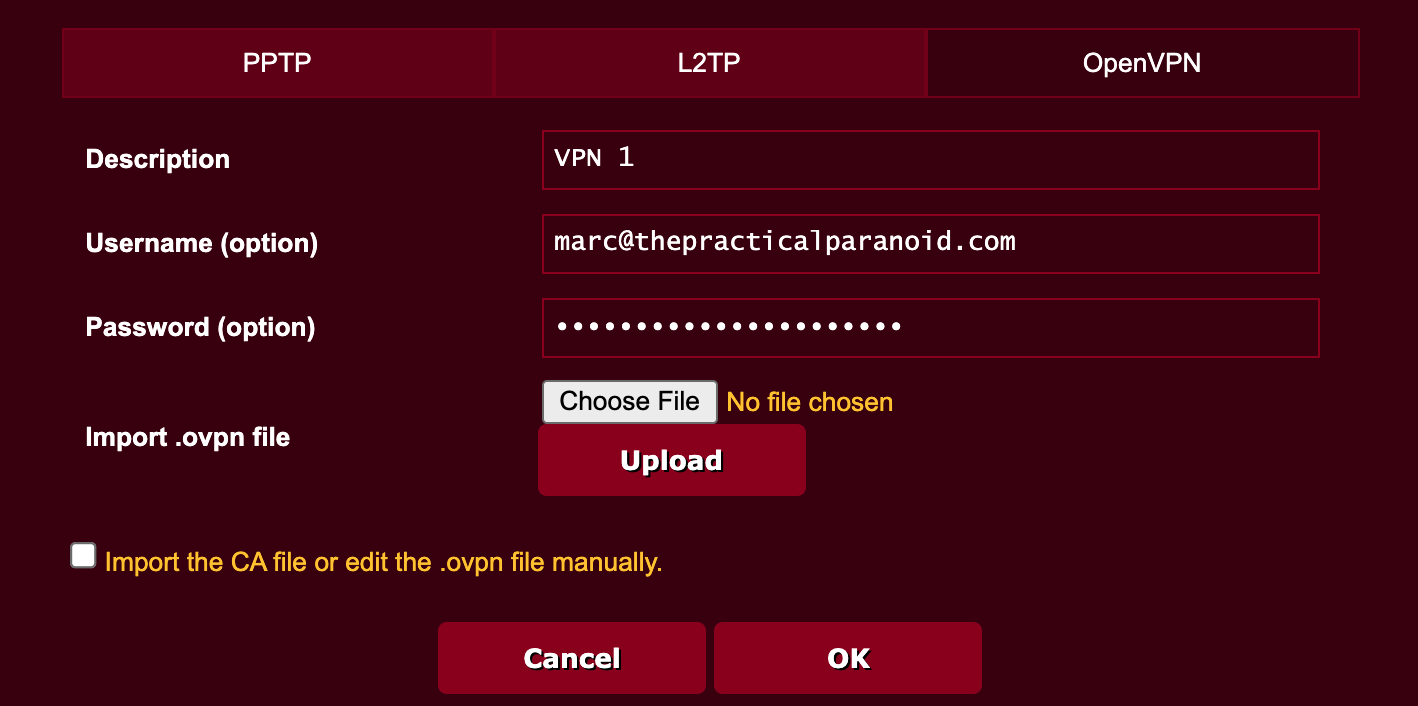
  10. Enter your VPN account credentials.
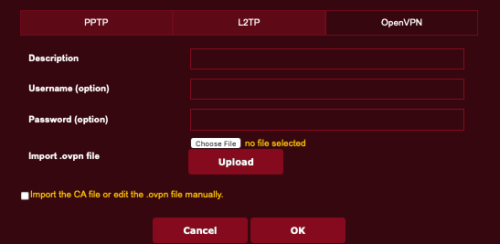
  11. Tap the Choose File button, then navigate to select the VPN configuration file downloaded from your VPN provider earlier in step 3.
  12. Tap the Upload button to install the VPN configuration file.
  13. Tap the OK button.
  14. Back to the router VPN page, you will see your new configuration listed. Tap the Activate button to enable the use of the configuration.
  15. Scroll down to the Exception List. This is where you assign devices. to use VPN.
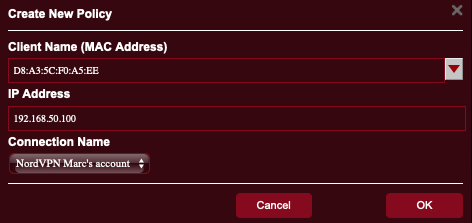
  16. Tap the + button. The Create a New Policy window opens. From here you select the target device(s).
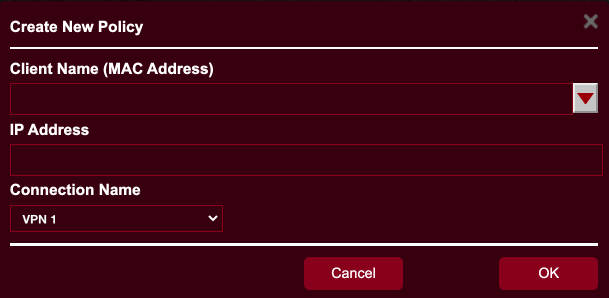
  17. Tap the Client Name field. A list of all devices currently connected to the router appears. Select your target device. It will show in the Client Name field, and its IP address shows in the IP Address field.
  18. Tap the Connection Name field, then select the VPN configuration you created earlier.
  19. Tap OK.
  20. The device appears in the Exception List.
  21. Tap the Activate button to enable the device to use VPN.
  22. If you have additional devices you want to be connected to VPN, repeat steps 16-21.
  23. Tap the Apply button to save your work.
  24. The router will save the settings, then reboot.
  25. Once the router is back online, the target device(s) will be connected via VPN, secure from prying eyes.