It’s Time To Upgrade Your Email Security
Your communications through email have become one of the most highly prized targets of criminal hackers. Your email contains literal keys to your kingdom:
- Security codes, passwords, email addresses, social security, income–pretty much anything and everything that it takes to steal your identity.
- Business plans, banking communications, upcoming corporate changes–information that your competitors, and sometimes regulators, would love to get their hands on.
- There are backdoor settings that allow others (the criminal hackers) to pretend to be you so they may perform crimes in your name.
Changes in the technical management of email now give us the tools to help fight back, and protect your email security and privacy. It is now time to make use of these tools because the bad guys pick on the vulnerable.
PLANNING PHASE
Gather the following information:
- DNS Host, login URL, administrator username, and password.
- Email Host, Administrator login URL, username, and password.
- Administrator login URL, username, and password for any services linked to your email, such as: newsletters produced by you or your organization, mass email and CMS providers such as MailChimp, etc.
- If this is your first time, give yourself 3-4 hours to complete for an individual, 10-14 hours to complete for an organization, including study, testing, and 2-week and 4-week adjustments.
STEP 1: CREATE AN SPF FOR YOUR DOMAIN
SPF (Sender Policy Framework) is an email-validation system. Its job is to detect spoofed email. When a criminal hacker sends email to you with fake “from” information (say perhaps, a Nigerian Prince? Or a vendor submitting an invoice for payment? How about an attorney threatening to sue unless they receive payment?), your email server is able to validate or invalidate the sender.
If the sender of an email is validated, the email comes on through as it always has. If the sender is invalidated, the spoofed/fake/junk email simply never makes it to your inbox.
Not only does this help prevent fake email from making it into your inbox, it also helps to prevent anyone from sending fake email using your email address or an email address with your domain.
Implementing SPF for your domain email is usually quick and easy, but it does require modification to your DNS records, and the record values are different for each email host. For this example, we will use Google.
- In a web browser, go to your DNS records, and select to EDIT.
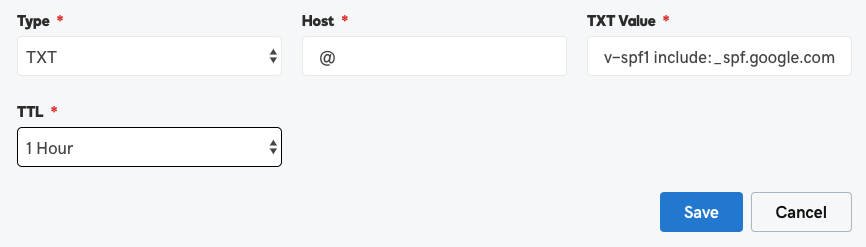
- Create a new TXT record with the following values:
- Name/Host/Alias enter @.
- Time to Live enter 3600.
- Value/Answer/Destination enter v-spf1 include:_spf.google.com ~all.
- Save the DNS changes
- Verify the changes. For Google this is done through https://toolbox.googleapps.com/apps/checkmx/
- Enter your domain name, and then select Run Checks!
- When the test completes, select Effective SPF Address Ranges.
- The results should include:
_spf.google.com
_netblocks.google.com followed by several IP addresses
_netblocks2.google.com followed by several IP addresses
_netblocks3.google.com followed by several IP addresses
STEP 2: CREATE A DKIM RECORD FOR YOUR DOMAIN
DKIM (Domain Keys Identified Mail) is another email authentication protocol designed to detect email spoofing. DKIM verifies that email that claims to have come from a domain is authorized by the owner of that domain. It is able to prevent the criminal from forging your email address, as is often done in phishing and email spam.
As with SPF, implementing DKIM requires access to your DNS records. The process is a bit different with each email host. In this example, we will use Google.
- Generate the public domain key for your domain.
- Open a browser to admin.google.com.
- Select Apps > G Suite > Gmail > Authenticate email.
- Select the target domain for which you want to generate a domain key.
- Click Generate new Record.
- Click Generate.
- A text box displays a 2048-bit key.
- Select and then copy this key.
- Open a new web page, and then go to your DNS management page.
- Create a new TXT record.
- Paste in the key created in step 1.7 above.
- Enter the other fields generated in 1.6 above.
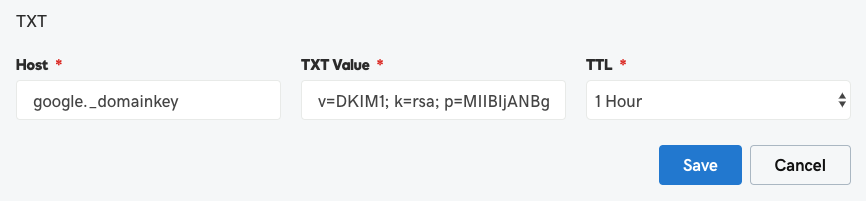
- Save the changes made to your DNS records.
STEP 3: ENABLE SIGNING EMAIL MESSAGES WITH THE DOMAIN KEY
Now that the DKIM is in place, we need to automate the process of including it with each email sent from your domain. In this example, we will use Google.
- Open a browser to admin.google.com.
- Select Apps > G Suite > Gmail > Authenticate email.
- Select the target domain for which you want to generate a domain key.
- Select Start authentication.
STEP 4: CONFIGURE DMARC
DMARC (Domain-based Message, Authentication, Reporting & Conformance) is the configurable policy for how to handle email that fails DKIM validation. The options are to take no action, quarantine the email, or reject the email.
For DMARC and DKIM to work, all of your email must be sent through your own domain, not through a different domain, or forwarded through a different domain.
- Open a browser to your DNS records.
- Create a new TXT record with the following attributes:
- Record Name/Host is _dmarc.your_domain.com
- Value (to take no action) is v=DMARC1; p=none; rua=mailto:administrator_email_address
- Value (to quarantine) is v=DMARC1; p=quarantine; rua=mailto:administrator_email_address
- Value (to reject) is v=DMARC1; p=reject; rua=mailto:administrator_email_address
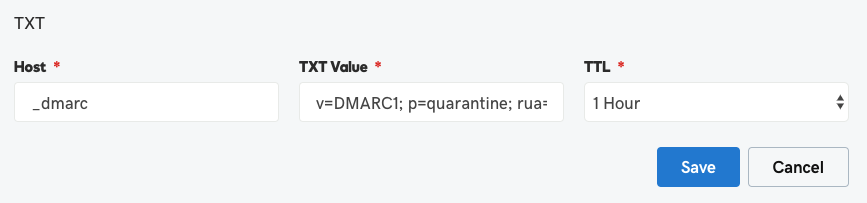
- Save your changes
- There are many more variables and options available. All of which may be found at the DMARC Tag Registry.
STEP 5: IMPLEMENT 2-FACTOR AUTHENTICATION
Although 2-Factor Authentication (sometimes called 2-Step Verification or Multi-Factor Authentication) is a completely separate security protocol, this is a great time to finally get to this honey-do item. In todays IT environment, having 2-Factor Authentication is the only thing stopping the criminal from taking control of your email.
Not every email provider makes 2-Factor Authentication available. If yours does not, RUN to a different provider–one that takes your security and privacy seriously. If your email provider does make 2-Factor Authentication available, find their help page for how to configure. Each provider will have a different authentication process.
OR, HAVE MINTZIT DO IT FOR YOU!
MintzIT holds higher IT certification, more certifications, more years of experience, and more customer commendations than any other IT consultant in New Mexico. We will make this a quick and painless process for you and your organization. Please feel free to call for a quote.
Warmly,
Marc L. Mintz
President & CIO
Mintz InfoTech, Inc.
505.814.1413 x 1
marc@mintzit.com
Additional reading:
- Google About SPF Records
- Google Turn on email signing
- Google About DKIM
- Google About DMARC
- Google Add a DMARC record


online transmission exemplifies a electronic type of audio broadcasting that employs the World Wide Web to broadcast wireless signals, differing from customary transmission that relies on website https://aurorafluxmedia.wikiconverse.com/4751304/how_to_use_internet_radio_for_branding terrestrial, space, or wired formats. This tech enables individuals to access a myriad of radio channels from about the globe, providing a varied spectrum of kinds, tongues, and cultures without the curb of geographic frontiers.
Online broadcasting outlets commonly https://www.principia.edu/radio provide individualized live services, in which listeners can pick stations or music selections that fit their personal tastes. The ease of access and variety of online radio have radically transformed how individuals uncover melodies and news. With merely a several taps, audiences can look into content from nearly any spot at any time, whether it be using a internet explorer or specific applications on mobile phones and tablets.
This convenience, coupled with the capacity to communicate more personally with broadcasters via virtual chat rooms or social networks, elevates the auditory encounter, making web broadcasting a widespread option among modern viewerships.